

What is LCD 16x2? A practical guide for hobbyists
TL;DR:
- A 16x2 LCD is a common character display module that shows 32 characters across two rows using the HD44780 controller. It is favored for its simplicity, low power consumption, and compatibility with microcontrollers like Arduino and Raspberry Pi. Its straightforward design makes it ideal for status screens, menus, and educational projects.
An LCD 16x2 is a character-based liquid crystal display module that shows 32 alphanumeric characters arranged in two rows of 16 columns each. It is one of the most widely used display modules in electronics education and DIY projects worldwide. The module is built around the Hitachi HD44780 controller, which has become the industry standard for character LCD interfacing. If you have ever seen a temperature reading on a home weather station or a status message on a DIY Arduino project, there is a good chance you were looking at a 16x2 LCD display.
What is LCD 16x2 and how is it built?
A 16x2 LCD display shows 32 characters total, with each character rendered inside a 5x8 pixel matrix. That gives you enough resolution to display clear letters, numbers, and basic symbols. The module typically measures around 80mm x 36mm x 10mm, making it compact enough to fit into most project enclosures. Current consumption sits near 1mA without the backlight active, which makes it well suited to battery-powered builds.
![]()
The display works by modulating an external light source rather than generating its own light. The liquid crystal layer acts as an electronic shutter, and the backlight provides illumination. This approach keeps power draw low compared to emissive technologies like OLED. You can read more about how this technology fits into the broader world of LCD display types if you want a wider picture.
Backlight colour options include blue with white text and green with black text, with blue being the most common variant sold today. The physical construction is straightforward: a glass panel sandwiched between polarising filters, with the liquid crystal material in between. The HD44780 controller chip sits on the PCB and handles all the timing and pixel addressing.
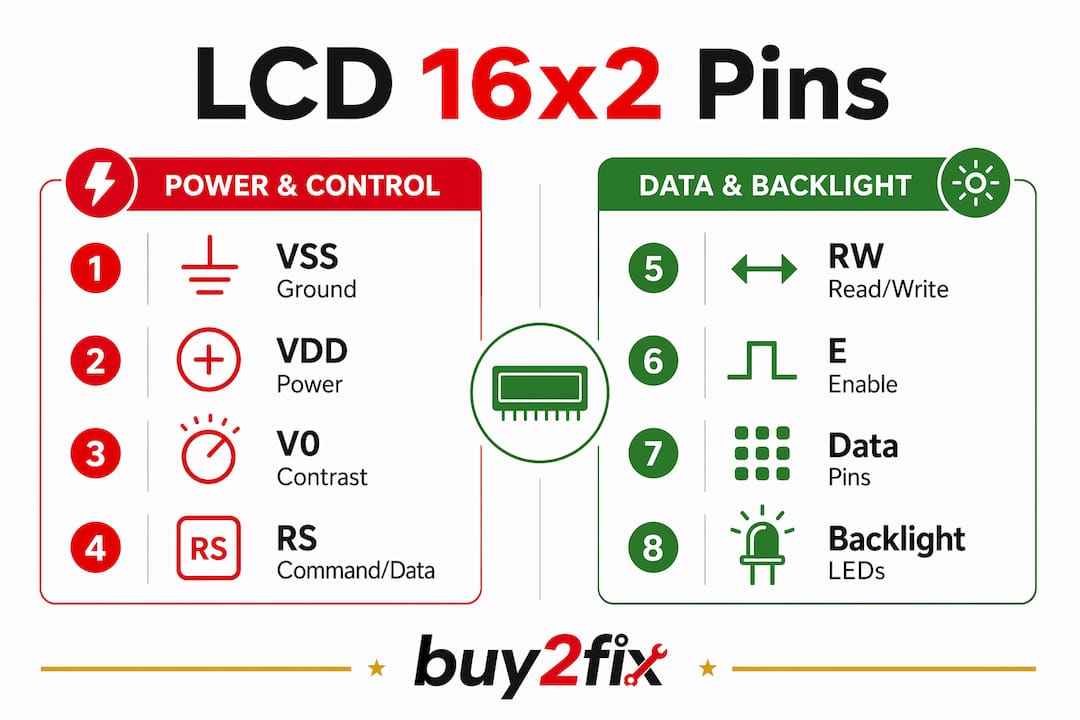
Pin configuration: what do all 16 pins do?
The HD44780 controller uses a 16-pin interface that covers power, contrast, control signals, data lines, and backlight connections. Standard operating voltage is 5V. Here is what each pin group does:
| Pin | Label | Function |
|---|---|---|
| 1 | VSS | Ground (0V reference) |
| 2 | VDD | Power supply (+5V) |
| 3 | V0 | Contrast adjustment via potentiometer |
| 4 | RS | Register select: command or data mode |
| 5 | RW | Read/write select (usually grounded for write-only) |
| 6 | E | Enable signal to latch data |
| 7–14 | D0–D7 | 8-bit data bus (or 4 lines used in 4-bit mode) |
| 15 | LED+ | Backlight anode (+5V) |
| 16 | LED- | Backlight cathode (GND) |
The RS pin tells the controller whether the incoming byte is a command (such as clear screen) or a character to display. The E pin acts like a clock pulse: the controller reads the data lines on each falling edge of E. The RW pin is almost always grounded in hobbyist builds, which simplifies communication to write-only operation.
The V0 pin is the one that catches beginners out most often. It needs a potentiometer connected between VDD and VSS, with the wiper feeding V0. Without it, the contrast is either too high or too low, and the screen appears completely blank even when the code is running correctly.
Pro Tip: Use a 10kΩ potentiometer on the V0 pin and turn it slowly while the module is powered. You will see the character blocks appear as you hit the right contrast level. This single step resolves the majority of blank screen problems.
How does LCD 16x2 work with microcontrollers?
The 16x2 LCD is a character-based display with no ability to render graphics or images. Every character you send maps to a code in the HD44780’s built-in character ROM, which covers standard ASCII characters plus some symbols and Japanese katakana. The controller handles all pixel-level timing internally, so your microcontroller only needs to send character codes and commands.
Communication happens in one of two modes:
- 8-bit mode uses all eight data lines (D0 to D7) and sends a full byte in one operation. It is faster but requires 11 GPIO pins on your microcontroller.
- 4-bit mode uses only D4 to D7 and sends each byte as two 4-bit nibbles. It needs just 6 GPIO pins and is the standard choice for Arduino and PIC projects.
- I2C mode uses an adapter backpack that converts the parallel interface to a 4-pin I2C connection (GND, VCC, SDA, SCL). This reduces wiring to four wires and frees up most of your microcontroller’s GPIO pins.
The HD44780 controller is compatible with Arduino, PIC, and Raspberry Pi, and all three platforms have mature, well-documented libraries. On Arduino, the LiquidCrystal library handles 4-bit and 8-bit modes. The LiquidCrystal_I2C library covers I2C backpacks. On Raspberry Pi, Python libraries such as RPLCD make integration straightforward.
Pro Tip: If you are using a Raspberry Pi and want to keep your GPIO header tidy, an I2C backpack is the single best upgrade you can make to a 16x2 LCD build. Four wires instead of eleven is a meaningful difference on a crowded breadboard.
The low power draw of the module makes it practical for battery-operated devices. The energy efficiency advantage over older CRT technology is substantial, and even compared to colour TFT screens, the 16x2 LCD uses far less current during normal operation.
LCD 16x2 vs other display types: which should you choose?
The 16x2 LCD sits in a specific niche. It is not the right choice for every project, but for a large category of builds it is the most sensible option available.
| Feature | LCD 16x2 | Graphical LCD | TFT Colour Display |
|---|---|---|---|
| Output type | Text only | Text and basic graphics | Full colour graphics |
| Wiring complexity | Moderate (6–16 pins) | High | High |
| Power consumption | Very low | Low to moderate | Moderate to high |
| Cost | Low | Moderate | Moderate to high |
| Library support | Excellent | Good | Good |
| Best use case | Status readouts, menus | Custom graphics, icons | Rich UI, images |
Text-based status readouts and simple menus are where the 16x2 LCD genuinely excels. Sensor feedback displays, diagnostic tools, home automation panels, and educational microcontroller kits all benefit from its simplicity. The module does not require a powerful processor to drive it, which matters when you are working with a basic PIC or ATmega chip.
Graphical LCDs and TFT displays offer more visual flexibility, but they demand more from your wiring, your code, and your power supply. For a project that simply needs to show a temperature reading, a clock, or a system status message, the added complexity of a TFT display is unnecessary. The 16x2 LCD’s advantages in cost, power, and simplicity make it the default choice for embedded and educational applications.
Practical tips for using a 16x2 LCD in your DIY project
Getting a 16x2 LCD working reliably comes down to a handful of wiring and configuration decisions. Most failures trace back to the same small set of mistakes.
- Always connect the V0 pin to a potentiometer. A blank screen despite correct code is almost always a contrast issue. Do not skip this step.
- Ground the RW pin unless you specifically need to read from the display. Grounding it simplifies the interface and prevents floating pin issues.
- Use an I2C backpack if you are short on GPIO pins or want cleaner wiring. The I2C adapter reduces your connection count from up to 16 pins down to 4.
- Check your backlight connections. LED+ needs a current-limiting resistor (typically 220Ω) before connecting to 5V, or you risk burning out the backlight LED.
- Initialise the display properly in code. Most libraries require a short delay after power-on before sending commands. Skipping this causes erratic behaviour on first boot.
For longevity, avoid running the backlight at full brightness continuously if the project runs 24 hours a day. Dimming the backlight via PWM on the LED+ pin extends its lifespan considerably. The DIY repair essentials guide on the Buy2fix blog covers LCD maintenance in more depth.
Pro Tip: Before soldering anything, test your LCD on a breadboard with a potentiometer on V0 and a known-good Arduino sketch. Confirming the display works before permanent assembly saves a lot of frustration later.
Key takeaways
The LCD 16x2 is the most practical text display for DIY electronics: low cost, low power, and supported by every major microcontroller platform through the HD44780 standard.
| Point | Details |
|---|---|
| Core definition | A 16x2 LCD shows 32 characters across two rows using a 5x8 pixel matrix per character. |
| Controller standard | The Hitachi HD44780 controller drives the module and is compatible with Arduino, PIC, and Raspberry Pi. |
| Wiring simplification | An I2C backpack reduces the connection count from up to 16 pins down to just 4. |
| Most common failure | A blank screen usually means the V0 contrast pin has no potentiometer connected. |
| Best use cases | Status readouts, sensor displays, simple menus, and educational microcontroller projects. |
Why the 16x2 LCD still earns its place on the workbench
I have been working with microcontroller projects for years, and the 16x2 LCD is still the first display I reach for when I need to add output to a build. There is a temptation, especially for beginners, to jump straight to colour TFT screens because they look more impressive. In practice, that choice often creates more problems than it solves.
The HD44780 standard has been around since the 1980s, and that longevity is not an accident. The protocol is simple, the libraries are mature, and the failure modes are predictable. When something goes wrong with a 16x2 LCD, you can diagnose it in minutes. When something goes wrong with a TFT display driver, you can spend an afternoon chasing down SPI timing issues.
The I2C backpack changed how I use these modules. Before I started using them, the wiring on a 16x2 LCD was genuinely fiddly, especially on a small breadboard. Four wires is a completely different experience. If you are still wiring the parallel interface by hand, try an I2C backpack on your next build. The difference is immediate.
My honest advice to anyone starting out: build three or four projects with a 16x2 LCD before moving to graphical displays. You will learn more about how displays communicate with microcontrollers from this simple module than from anything else. The constraints are the lesson.
— Adewale
LCD 16x2 modules at Buy2fix
Buy2fix stocks LCD 16x2 modules compatible with Arduino, Raspberry Pi, and PIC-based projects, alongside a broad range of DIY electronics components and accessories. Whether you are building your first microcontroller project or adding a display to an existing build, you will find reliable LCD modules with clear specifications and free UK mainland shipping. Buy2fix applies quality checks before dispatch and backs eligible items with warranty support, so you can order with confidence. The 30-day return policy means there is no risk if a component does not suit your project.
FAQ
What does LCD 16x2 mean?
LCD 16x2 refers to a liquid crystal display module with 16 columns and 2 rows, capable of showing 32 characters total. Each character is formed within a 5x8 pixel matrix.
What controller does a 16x2 LCD use?
The 16x2 LCD uses the Hitachi HD44780 controller, which is compatible with Arduino, Raspberry Pi, and PIC microcontrollers through well-supported libraries.
Why is my 16x2 LCD screen blank?
A blank screen is almost always caused by incorrect contrast adjustment. Connect a 10kΩ potentiometer to the V0 pin and adjust it while the module is powered to bring the characters into view.
What is the difference between 4-bit and 8-bit mode?
In 8-bit mode, the LCD uses all eight data lines and sends a full byte at once. In 4-bit mode, only four data lines are used and bytes are sent in two halves, requiring fewer GPIO pins on your microcontroller.
Can a 16x2 LCD display images or graphics?
No. The 16x2 LCD is a character-only display and cannot render images or freeform graphics. For graphical output, a graphical LCD or TFT colour display is required.
Recommended
Let customers speak for us
Well made part very strong easy to fit great value for the money

Well packed, with fast shipping :)

Exactly what the doctor ordered…great color, comfort, and durability. Trust this watch band!

Brilliant strap, second purchase, bought bracelet before. Excellent value. Thank you

Great item for splitting your Audio signal

Outstanding product!
Next level customer service.

Very satisfied but the delivery needs to get more faster...

Good price,quick delivery

Best phone case ever! This is my second one as I broke my first. Would defo recommend

Great fitting Apple Watch bands

For Apple Watch Ultra 3 / 2 / 1 49mm RedPepper Armor Metal Case Integrated Silicone Watch Band(Steel Black White)

Good price and quick postage

Perfect fit.

Absolutely necessary

Second Purchase and still a very happy customer. Keep up the good work.
