

iPhone 12 Pro Max Back Screen Replacement Guide UK
Every british DIY enthusiast knows how fast iPhone accidents can eat into your wallet. With official repair costs often exceeding £300 for an iPhone 12 Pro Max back glass replacement, many are turning to at-home solutions for massive savings. This straightforward guide explains how to set up a safe workspace, gather tools, and replace your screen step by step—all with a focus on affordable, quality parts and the assurance that your repair efforts will pay off.
Table of Contents
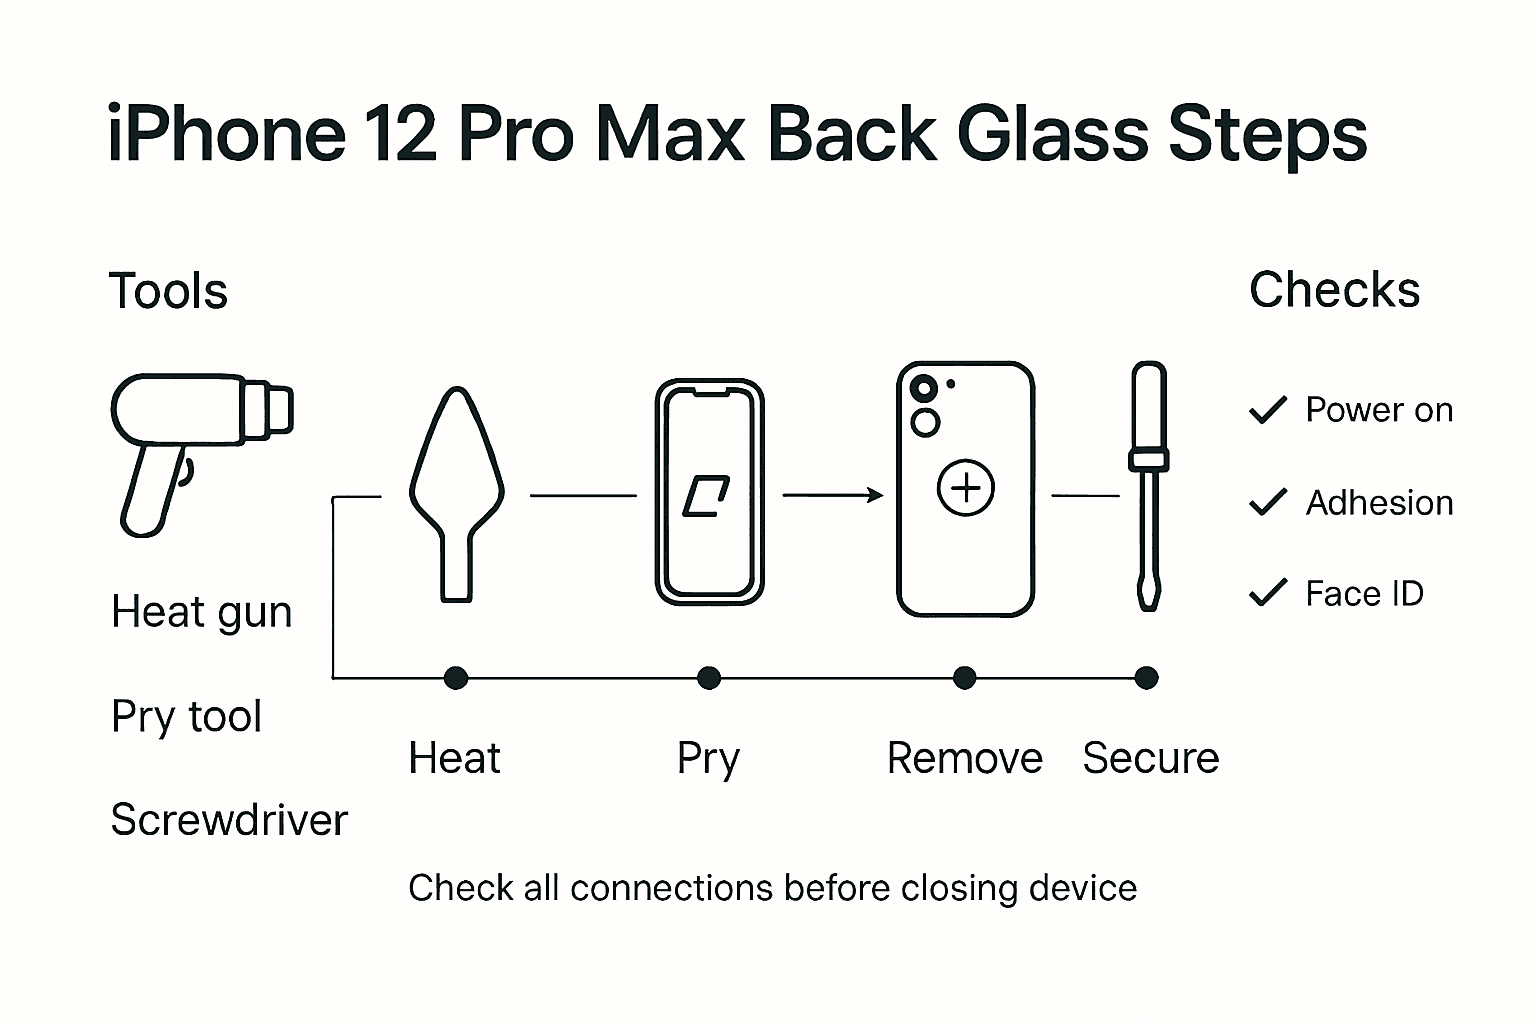
- Step 1: Prepare Workspace And Required Tools
- Step 2: Power Off And Remove SIM Card Tray
- Step 3: Heat And Detach The Damaged Back Glass
- Step 4: Install The New Back Glass And Reassemble
- Step 5: Test And Inspect The Completed Repair
Quick Summary
| Main Insight | Explanation |
|---|---|
| 1. Organise Your Workspace | A clean and well-lit area minimises damage risks and supports effective repairs. Use non-conductive surfaces and store small parts safely. |
| 2. Power Off Before Repair | Always shut down your iPhone and remove the SIM card to prevent electrical damage during disassembly. |
| 3. Apply Heat Carefully | Use a controlled, low-temperature heat source to soften adhesive without damaging components. Maintain distance and use a suction cup for removal. |
| 4. Clean and Prepare Before Installation | Remove old adhesive and ensure the surface is clean to promote proper adhesion of the new back glass. |
| 5. Conduct Thorough Tests Post-Repair | Verify all functions, including touchscreen and Face ID, to ensure the repair is successful and all components work properly. |
Step 1: Prepare workspace and required tools
Before diving into your iPhone 12 Pro Max back screen replacement, you need a meticulously organised workspace that minimises potential damage risks. Creating the right environment is just as crucial as having the correct tools. Your workspace should be a clean, well-lit area with plenty of room to spread out your components and tools.
First, gather all essential tools recommended by official Apple repair documentation. You will need precision screwdrivers specifically a pentalobe driver for Apple devices, anti-static tweezers, a suction cup, plastic pry tools, a heat source like a hairdryer or heat gun for softening adhesive, and protective gloves. An anti-static mat is highly recommended to protect sensitive electronic components from electrostatic discharge. Arrange these tools within easy reach but away from potential spills or accidental knocks.
Ensure your workspace is static free by avoiding carpeted areas and working on a hard, non conductive surface. Keep a small container nearby to store screws and small components as you disassemble the device. Remove any liquids, food, or unnecessary items that could potentially interfere with your repair process. Work in a well ventilated area with consistent temperature to maintain optimal conditions for delicate electronic work.
Expert Tip: Always keep a clean microfibre cloth nearby to wipe away dust or fingerprints and maintain a pristine working environment during your repair.
Step 2: Power off and remove SIM card tray
Preparing your iPhone 12 Pro Max for screen replacement begins with safely powering down the device and removing the SIM card tray. This critical first step helps prevent potential electrical damage and ensures a smooth repair process.
According to official Apple repair documentation, completely shutting down your iPhone is essential before beginning any repair work. Press and hold the side button and either volume button simultaneously until the power off slider appears. Drag the slider to turn off the device completely. Wait approximately 30 seconds to ensure all internal systems have powered down.
Next, locate the SIM card tray on the right side of your iPhone. You will need a SIM eject tool or a straightened paperclip to remove the tray. Gently insert the tool into the small pinhole next to the tray. Apply light, steady pressure until the tray pops out. Carefully slide the tray out of the device and place the SIM card and tray in a safe location where they will not be misplaced during the repair process.
Expert Tip: Place your removed SIM card inside a small resealable bag or magnetic parts tray to prevent losing this tiny but crucial component during your repair.
Step 3: Heat and detach the damaged back glass
Removing the damaged back glass from your iPhone 12 Pro Max requires precision, patience, and careful heat application. This delicate process involves softening the adhesive without causing additional damage to the device’s internal components.
Detailed Apple repair guidelines recommend using a controlled heat source like a professional heat gun or hairdryer set to low temperature. Hold the heat source approximately 10 centimetres away from the back glass, moving it continuously to distribute warmth evenly. This gradual heating helps soften the strong adhesive securing the glass panel without risking thermal damage to sensitive electronic components.
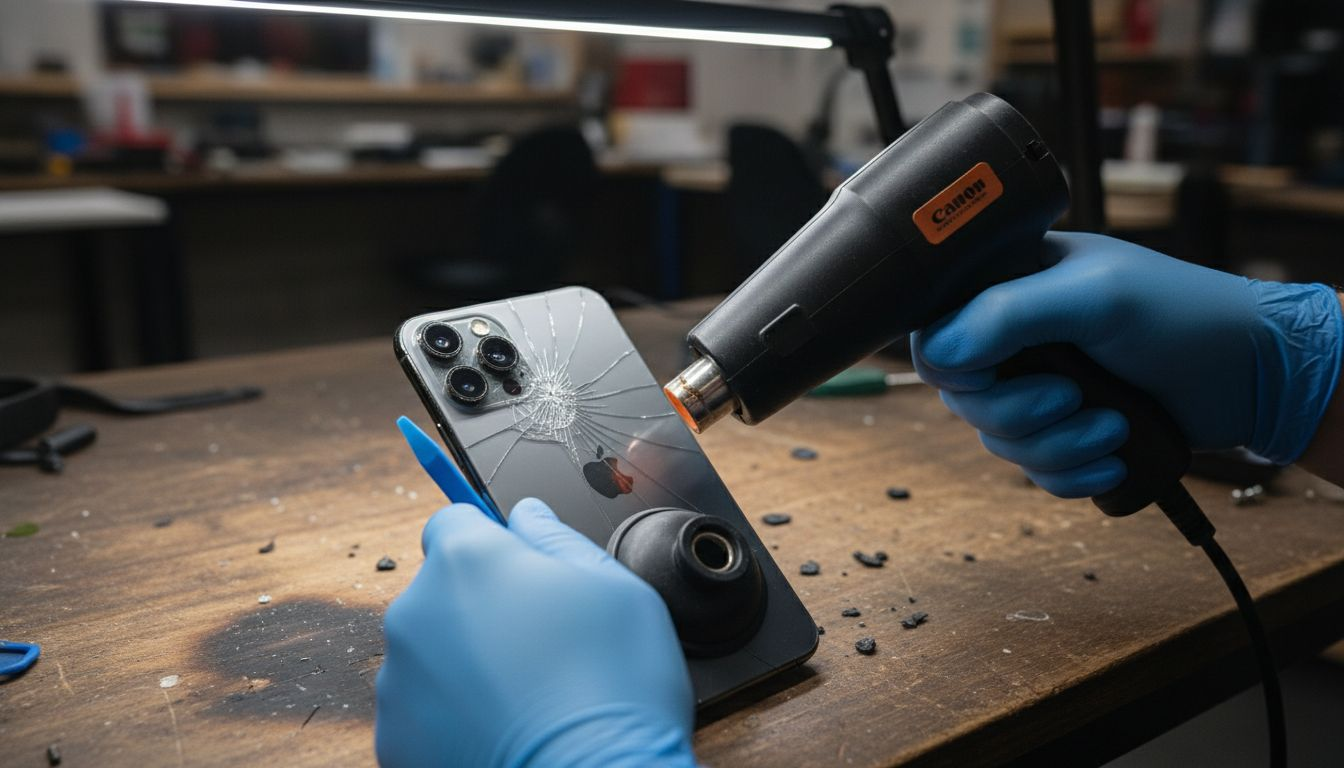
Once the adhesive is sufficiently warmed, prepare a sturdy suction cup and a plastic pry tool. Carefully position the suction cup near a corner of the back glass, ensuring a firm grip. Apply gentle upward pressure while simultaneously using the plastic pry tool to create a small separation between the glass and the iPhone frame. Work slowly and methodically, moving around the edges to progressively lift the back glass. Maintain consistent, even pressure to prevent cracking or further damaging the glass during removal.
Expert Tip: Use a pair of thin, non conductive gloves to protect your hands from heat and provide better grip during the delicate glass removal process.
Step 4: Install the new back glass and reassemble
The final stage of your iPhone 12 Pro Max repair involves carefully installing the new back glass and meticulously reassembling the device to restore its original integrity and functionality. This process requires precision and attention to detail to ensure a successful repair.
Comprehensive repair guidelines recommend thoroughly cleaning the device frame with isopropyl alcohol and a lint-free cloth to remove any previous adhesive residue. Apply new adhesive strips precisely along the frame edges, ensuring complete coverage without overlapping. Position the replacement back glass carefully, starting from one corner and slowly lowering it onto the frame. Apply gentle but firm, even pressure across the entire surface to guarantee proper adhesion and eliminate any potential air bubbles.
As you reassemble the device, carefully replace all internal components in their original positions. Reinsert the SIM card tray, reconnect any flex cables, and ensure all seals remain intact to maintain the iPhone’s water resistance. Double check that all components are securely fastened and aligned correctly before performing a final visual inspection. Gently test the back glass to confirm it is firmly attached and flush with the device frame.
Expert Tip: Work in a clean, well-lit area and use a magnifying glass to inspect your work, ensuring no dust or debris gets trapped during the reassembly process.
Here’s a summary of common mistakes and their effects during back glass replacement:
| Mistake | Possible Cause | Impact on Repair |
|---|---|---|
| Using excess heat | Heat gun held too close | Internal component damage |
| Working in dusty environment | Lack of preparation | Debris trapped under glass |
| Misplacing small parts | No organiser for screws | Difficult reassembly, errors |
| Incomplete adhesive removal | Insufficient cleaning | Poor back glass adhesion |
| Not testing functions | Skipping device checks | Missed faults post-repair |
Step 5: Test and inspect the completed repair
With the back glass replacement complete, the final critical step is thoroughly testing and inspecting your iPhone 12 Pro Max to ensure the repair was successful and all functionalities remain intact. This comprehensive evaluation will confirm the quality of your repair work and identify any potential issues.
Official Apple repair documentation recommends a systematic testing approach. Begin by powering on the device and verifying the display functions correctly. Check the touchscreen responsiveness across all areas, ensuring no dead zones or unresponsive regions exist. Test Face ID by attempting to unlock the phone and verify camera functionality by opening the camera app and taking a few test photos. Pay close attention to wireless charging performance by placing the iPhone on a compatible charging pad to confirm proper electrical connections.
Carefully inspect the physical repair site for any signs of improper assembly. Look for even adhesion around the back glass edges, checking that no gaps or misalignments are present. Gently apply light pressure around the edges to confirm the back glass is securely attached. Test the device’s water resistance by ensuring all seals remain intact and no visible gaps compromise the structural integrity. If any issues are detected, carefully review your reassembly steps and consider professional assistance if needed.
This table outlines essential post-repair checks and their purpose:
| Test Performed | Purpose | What to Look For |
|---|---|---|
| Power on device | Ensure successful reassembly | Boots up, normal operation |
| Touchscreen test | Confirm digitiser functionality | No dead spots or lagging |
| Face ID and camera | Validate sensor and camera operation | Accurate unlocking, clear images |
| Wireless charging | Check charging coil connections | Charges when placed on pad |
| Seal check | Maintain water resistance | No visible gaps at edges |
Expert Tip: Create a comprehensive backup of your iPhone data before conducting final tests, ensuring you have a safety net in case any unexpected complications arise during the repair process.
Get the Right Replacement Parts for Your iPhone 12 Pro Max Back Screen Repair
Replacing the back glass of your iPhone 12 Pro Max is a delicate task that demands precision tools and high-quality parts. Whether you are a DIY enthusiast or a professional technician, sourcing the correct replacement components like the SIM card tray, adhesive strips, and back covers can make all the difference in achieving a flawless repair. Avoid common pitfalls such as poor adhesion or damaged internal components by choosing parts that meet stringent quality standards.
At Buy2fix, we specialise in providing premium mobile phone repair parts for iPhone models including the 12 Pro Max. With our extensive inventory, free UK mainland shipping, and a one-year warranty, you can trust us for all your repair needs. Explore our selection of Mobile Phone Repair Parts to find genuine or best-quality aftermarket back glass panels and related accessories. Act now to restore your device with confidence and ensure a lasting repair by visiting us at Buy2fix. Your next step is just a click away from professional-grade parts delivered straight to your door.
Frequently Asked Questions
How do I prepare my workspace for the iPhone 12 Pro Max back screen replacement?
Ensure your workspace is clean, well-lit, and organised to minimise damage risks. Gather necessary tools like precision screwdrivers, suction cups, and plastic pry tools, then arrange them within easy reach while maintaining a safe distance from liquids and food.
What are the steps to power off and remove the SIM card tray from an iPhone 12 Pro Max?
Begin by pressing and holding the side button and either volume button until the power off slider appears, then drag the slider to shut down the device completely. Next, use a SIM eject tool or a straightened paperclip to gently remove the SIM card tray from the right side of the device.
How can I detach the damaged back glass during the replacement process?
Apply even heat using a heat source, such as a hairdryer or heat gun, to soften the adhesive on the back glass. Once warm, use a suction cup to lift a corner and insert a plastic pry tool to carefully separate the back glass from the device, working slowly to avoid cracking.
What should I do to ensure proper adhesion when installing the new back glass?
Thoroughly clean the device frame with isopropyl alcohol to remove old adhesive residues, then apply new adhesive strips along the edges without overlapping. Position the new back glass carefully, starting from one corner, and apply even pressure to ensure a secure fit with no air bubbles.
What tests should I conduct after replacing the back glass on my iPhone 12 Pro Max?
Power on the device and check that the display functions correctly, testing touchscreen responsiveness and Face ID functionality. Additionally, inspect for any gaps around the back glass edges and verify the wireless charging works as expected to confirm the integrity of the repair.
How can I prepare for unexpected issues during the testing phase after the repair?
Create a comprehensive backup of your iPhone data before testing any functions to ensure you have a safety net in case of complications. This step will protect your important information and allow for easier recovery if needed.
Recommended
Let customers speak for us
Well made part very strong easy to fit great value for the money

Well packed, with fast shipping :)

Exactly what the doctor ordered…great color, comfort, and durability. Trust this watch band!

Brilliant strap, second purchase, bought bracelet before. Excellent value. Thank you

Great item for splitting your Audio signal

Outstanding product!
Next level customer service.

Very satisfied but the delivery needs to get more faster...

Good price,quick delivery

Best phone case ever! This is my second one as I broke my first. Would defo recommend

Great fitting Apple Watch bands

For Apple Watch Ultra 3 / 2 / 1 49mm RedPepper Armor Metal Case Integrated Silicone Watch Band(Steel Black White)

Good price and quick postage

Perfect fit.

Absolutely necessary

Second Purchase and still a very happy customer. Keep up the good work.
