


1
/
von
9
No reviews
DC12V 1CH RF Remote Control Switch / 10A Relay / 433MHZ Switch Receiver
DC12V 1CH RF Remote Control Switch / 10A Relay / 433MHZ Switch Receiver
SKU: SYA0020612
Normaler Preis
£13.09
Normaler Preis
Verkaufspreis
£13.09
Versand wird beim Checkout berechnet
Duties & Import Tax Information
Duties are only included if shown at checkout. Otherwise, your local government may apply customs fees, which your courier will collect directly from you before delivery.
In Stock
CHN
This item is shipped from China.
Processed in 0–3 days
Anzahl
Verfügbarkeit für Abholungen konnte nicht geladen werden
Shipping info
To find all available shipping methods and exact delivery times, add the product to your cart and check using our shipping calculator.
30-day returns
Fast refunds: Once we receive and check your item, we aim to process your refund within 48 hours.
Return postage: Just changed your mind? You'll need to cover the return postage. If the item arrived faulty, we'll cover the cost to get it back to us.
Your details are safe
We treat your data the way we'd want ours treated. Your payment details are locked down with bank-level encryption. We never actually see your credit card numbers, and we will absolutely never sell your personal information.
Product Details
Type:
Others
Product Features
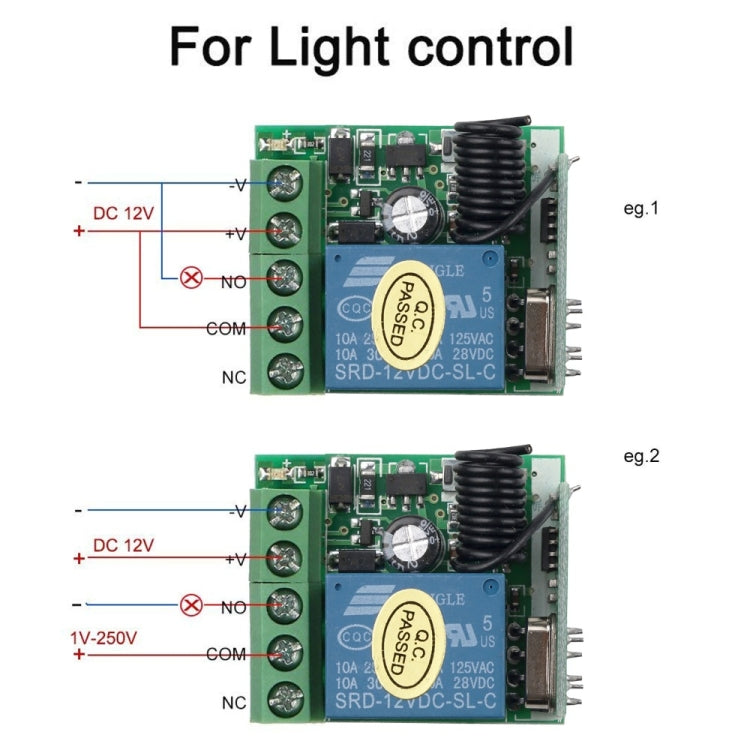
1. Output relay switching capability: Capable of controlling loads with voltages up to 250V. Requires a 12V power supply. 2. Small Size: The circuit board measures only 35x30x17mm.
3. User-Adjustable Operating Mode: Self-locking, interlocking, inching, and time-delay modes can be adjusted via pin short-circuit caps.
4. Learning Pairing: You can learn to pair with any remote controller with the same frequency (dont worry if you lose your remote during use; simply buy a new one and learn the code without having to replace the entire set, significantly saving costs).
Technical Parameters
1. Operating Voltage: DC 12V (3V/6V/9V/24V available on request)
2. Quiescent Current: Less than or equal to 10mA
3. Operating Temperature: -40 degrees Celsius to +80 degrees Celsius
4. Receiver Sensitivity: More than or equal to -95dB
5. Operating Frequency: Commonly 315MHz, 433.92MHz (other frequencies available on request)
6. Output Current: Less than or equal to 10A
7. Operating Mode: Inching, Self-Lock, Interlock, Delay (Adjustable)
8. Output Mode: Contact Output (AC and DC controllable)
Applications
This product uses an intelligent microprocessor control system and is suitable for garage door control, lighting control, remote curtain control, access control systems, and various motor control systems. It features a compact size, easy installation, and safe and reliable operation.
Learn How to Pair Code
1. Inching Learning Method:
Press the pairing button on the control panel once. The LED indicator will flash once. Then, press the button on the remote control to be paired. The LED indicator on the control panel will flash several times, indicating successful pairing.
2. Self-locking Learning Method:
Press the pairing button on the control panel twice. The LED indicator will flash twice. Wait until the LED indicator turns off. Then, press the button on the remote control to be paired. The LED indicator on the control panel will flash several times, indicating successful pairing.
3. Interlocking Learning Method:
Press the pairing button on the control panel three times. The LED indicator will flash three times. After the LED indicator turns off, press the A and B buttons on the remote control to be paired. The LED indicator on the control panel will flash several times, indicating successful pairing. 4. 5-Second Delay Learning Method:
Press the control panel pairing button 4 times in a row. The LED indicator will flash 4 times. After the LED indicator goes off, press the button on the remote control you want to pair. The control panel LED indicator will flash several times, indicating successful pairing.
5. 10-Second Delay Learning Method:
Press the control panel pairing button 5 times in a row. The LED indicator will flash 5 times. After the LED indicator goes off, press the button on the remote control you want to pair. The control panel LED indicator will flash several times, indicating successful pairing.
6. 15-Second Delay Learning Method:
Press the control panel pairing button 6 times in a row. The LED indicator will flash 6 times. After the LED indicator goes off, press the button on the remote control you want to pair. The control panel LED indicator will flash several times, indicating successful pairing.
Precautions
1. Do not operate with power on. Always turn off the power before operating. Only power on after confirming that everything is working properly.
2. If the remote control battery voltage is low, please replace the batteries immediately. (A low battery voltage in the remote control generally reduces the control range.) 3. When using wireless electronic products, avoid strong interference sources such as metal covers, large electronic devices, and electromagnetic fields to prevent the remote control from being too close to the receiver or causing it to malfunction.
4. Do not use this electronic product improperly. Improper use can reduce product performance and lifespan, and in severe cases, damage the product and pose a safety hazard.
5. The delay time setting is automatically set when entering learning mode. The delay time setting is linked to the number of times the learning button is pressed. Please pay special attention to this.
Verified Compatible
Guaranteed fit for device in the title. Wrong part? Full refund including shipping.
Teilen


£13.09