

How to test mobile components: a practical 2026 guide
TL;DR:
- Mobile component testing involves using diagnostic codes, software apps, and physical tools to identify faults in smartphones. Combining software diagnostics with physical testing ensures accurate problem detection and reduces unnecessary repairs.
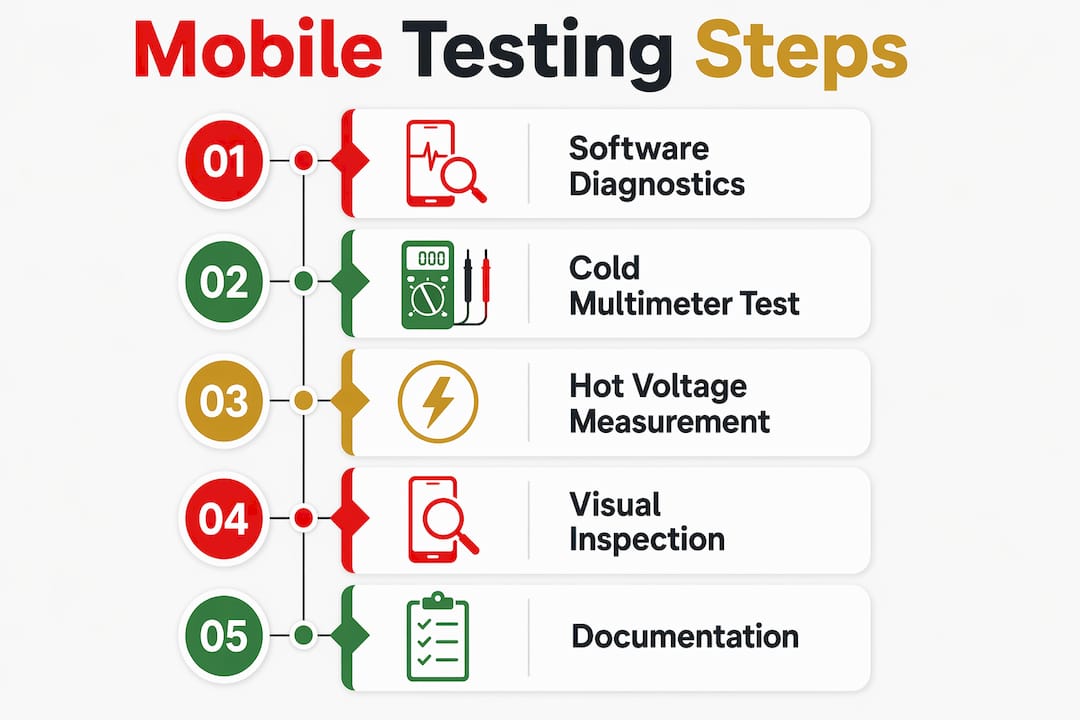
Mobile component testing is the process of checking smartphone parts for faults using diagnostic codes, software apps, and physical tools such as a digital multimeter. Whether you are repairing a cracked Samsung Galaxy screen or diagnosing a dead iPhone charging circuit, knowing how to test mobile components accurately saves you time and money. The industry standard approach combines software diagnostics first, then cold testing, then hot testing. This guide covers all three methods in plain language, with the tools and steps you need to get reliable results.
How to test mobile components using diagnostic codes and apps
Software diagnostics are the fastest starting point for any mobile component test. Diagnostic software testing before physical repair reduces unnecessary component replacements and saves troubleshooting time. That means you avoid pulling apart a phone for a hardware fault that turns out to be a software glitch.
Android secret codes
Most modern Android phones carry hidden diagnostic menus accessible via secret codes in the dialer. The most widely used is *#0*# on Samsung Galaxy devices, which opens a full hardware test menu covering the display, touch response, sensors, and cameras. Huawei and Xiaomi devices have their own equivalents, though the codes vary by model and firmware version.
To run a basic software diagnosis on Android:
- Open the phone dialer and type the relevant diagnostic code.
- Select each test category in turn: display, touch, vibration, speaker, microphone, and camera.
- Note which tests pass and which fail. A failed touch test, for example, points to the digitiser rather than the display panel itself.
- Exit the menu and cross-reference results before opening the device.
Diagnostic apps: TestM and Device Care
TestM covers up to 19 hardware areas including touchscreen, vibration motor, microphone, and sensors. That breadth makes it one of the most thorough free tools available for initial fault isolation. Samsung’s built-in Device Care app performs similar checks and is pre-installed on most Galaxy handsets.
Software testing has clear limits. It cannot detect a cracked solder joint, a corroded connector, or a failing power IC. When the diagnostic app returns a pass but the phone still misbehaves, physical testing is the next step.
Essential tools for physical mobile component testing
The right tools make the difference between a confident diagnosis and a guessed repair. You do not need a professional workshop, but you do need the following.
| Tool | Purpose | Safety tip |
|---|---|---|
| Digital multimeter | Measures resistance, voltage, and continuity | Set to correct mode before probing |
| DC bench power supply | Simulates battery power during hot testing | Start at 3.7V; never exceed 4.4V for battery rail |
| Magnifying glass or microscope | Visual inspection of PCB and connectors | Use adequate lighting to spot corrosion |
| Anti-static wrist strap | Prevents electrostatic discharge damage | Clip to a grounded surface before handling PCB |
| Freeze spray or thermal camera | Detects short-circuited components via temperature | Apply freeze spray briefly; avoid prolonged contact |
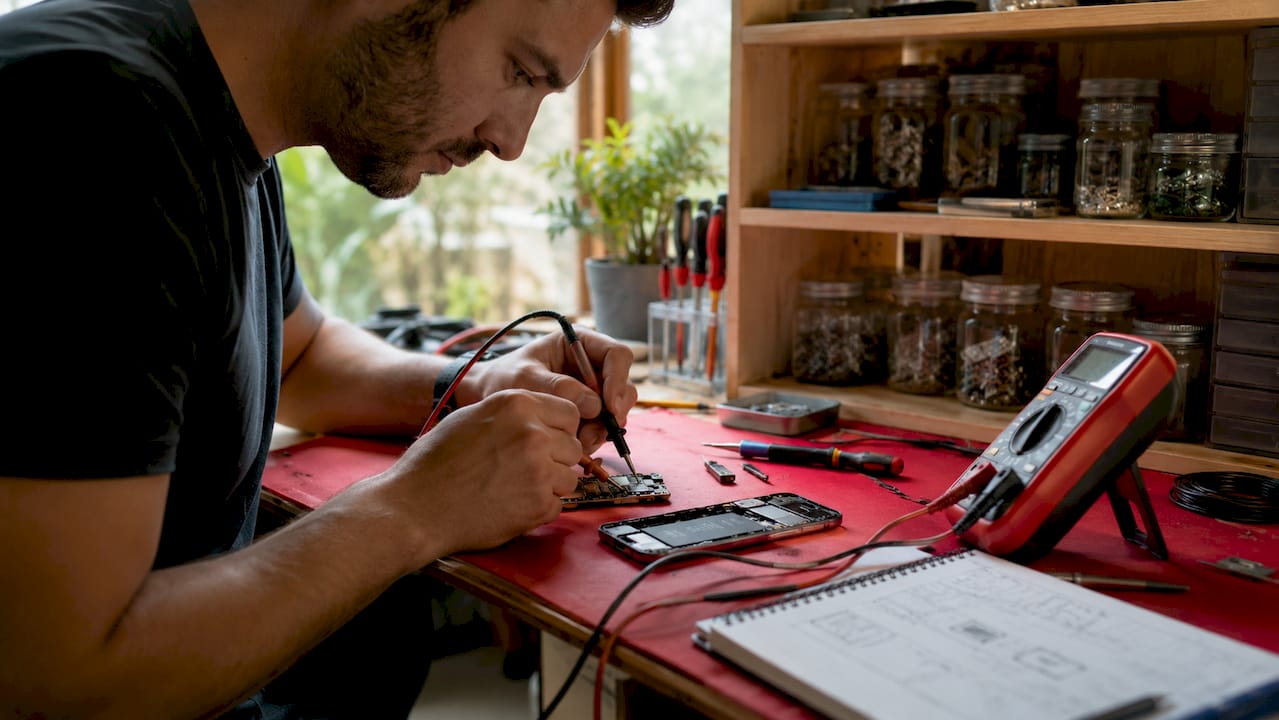
Before you touch any component, power off the device completely. Remove the battery where possible. Ground yourself with an anti-static strap. These steps are not optional. A single electrostatic discharge can destroy an IC that would otherwise have been fine.
Pro Tip: Handle multimeter probes near the tip, not the shaft. Accidental contact between probes on a live board can cause a short that damages the very component you are trying to test.
Step-by-step guide to cold testing with a multimeter
Cold testing is conducted with the device off using the multimeter’s diode mode. It is the safest method for beginners because there is no power running through the circuit. You are simply measuring resistance and checking for shorts or open circuits.
How to set up and run a cold test
- Set your multimeter to diode mode (the symbol looks like a triangle pointing to a line).
- Place the red probe on the ground point of the PCB. This is the key step most beginners get wrong. Ground is your reference for all readings.
- Touch the black probe to the component or connector pin you want to test.
- Read the display. A reading of 0.000 or a continuous beep indicates a short to ground. A reading of OL (overload) indicates an open circuit.
- Test the battery connector pins first: positive, negative, and the ID/thermistor pin.
- Move to the charging port connector, then the display connector, then any IC pins flagged by your schematic.
- Record every reading. Do not rely on memory.
Cold testing before hot testing prevents accidental shorts and motherboard damage. If you find a short during cold testing, do not power the device on until you have located and resolved it.
Interpreting readings on key components
Resistors should show a stable resistance value close to their rated value. Capacitors in diode mode typically show a brief low reading that climbs as the capacitor charges. A capacitor that reads 0.000 permanently is shorted. Diodes should show a forward voltage of roughly 0.4V to 0.7V in one direction and OL in the other. A diode reading 0.000 in both directions is blown.
Pro Tip: If you suspect a short on a specific rail but cannot find the faulty component visually, inject a small current through the shorted rail using a DC power supply set to current-limit mode. The component that heats up first is your culprit.
How to conduct hot testing on powered mobile circuits
Hot testing means measuring voltage and current on a live device connected to a DC bench power supply. This method pinpoints power supply faults, IC failures, and charging circuit problems that cold testing cannot reveal.
Setting up for hot testing
Connect the DC power supply to the battery connector using a battery connector cable. Set the voltage to 3.8V and the current limit to 0.5A before connecting. Power on the supply and observe the current draw before pressing the phone’s power button.
Safety note: Never connect a live power supply to a board that showed a short during cold testing. Resolve all shorts first. Working on a live circuit carries real risk of further board damage if you probe the wrong point.
Measuring key voltage points
- Set your multimeter to DC voltage mode.
- Measure the battery connector: a healthy reading sits between 3.7V and 4.4V.
- Measure the charging input line: a healthy reading sits between 4.9V and 5.2V during active charging.
- Measure the display power line, typically labelled VDDI or ELVDD on schematics. A missing voltage here explains a blank screen despite the phone booting.
- Measure the CPU core voltage rail. A missing or unstable reading here points to a faulty power management IC (PMIC).
Reading current draw patterns
Current draw tells you as much as voltage. A phone that draws above 0.15A before the power button is pressed may have a boot loop or CPU fault. A current spike above 2 amps on a powered device is a definitive sign of a major short circuit. That level of draw requires board-level repair, not a simple component swap.
For a deeper walkthrough of multimeter testing techniques, Buy2fix has a dedicated step-by-step resource covering both cold and hot methods in a retail repair context.
Visual inspection and practical tips for accurate testing
Visual inspection under magnification is a critical step to identify physical damage such as corrosion, cracks, or loose components. Skipping it wastes time because a cracked solder joint or a corroded charging port is visible before you touch a multimeter.
Work through visual inspection in this order:
- Check the PCB surface under a magnifying glass or microscope for burnt marks, lifted pads, or corrosion.
- Inspect all connectors for bent pins, debris, or oxidation. A cotton bud dipped in isopropyl alcohol clears most surface corrosion.
- Look at the battery connector for swelling or heat discolouration.
- Check the charging port for bent pins and lint blockage.
- Inspect the display and digitiser connectors for damage from previous repair attempts.
Combine visual findings with your app results. A failed microphone test in TestM combined with visible corrosion on the microphone connector points directly to the connector or the microphone itself, not the audio IC.
Pro Tip: Freeze spray or a thermal camera highlights faulty components via temperature changes. Apply freeze spray to a powered board with a known short and watch for the component that frosts over last. That component is absorbing the current and generating heat.
Document every finding as you go. A photo of each connector before disconnection and a written log of multimeter readings prevents the frustrating situation of forgetting which pin showed a short after you have reassembled the phone.
Key takeaways
Effective mobile component testing combines software diagnostics, cold multimeter testing, and hot voltage measurement in that order, with visual inspection running throughout.
| Point | Details |
|---|---|
| Start with software diagnostics | Use codes like #0# or apps like TestM to isolate faults before opening the device. |
| Cold test before powering on | Diode mode multimeter testing on an unpowered board prevents accidental shorts and board damage. |
| Know your voltage ranges | Battery rails read 3.7V–4.4V; charging input reads 4.9V–5.2V on a healthy device. |
| Current draw reveals severity | A draw above 2 amps on a live board signals a major short requiring board-level repair. |
| Document every step | Photographs and written readings prevent errors during reassembly and repeat diagnosis. |
What I have learned from years of mobile component testing
The biggest mistake I see from DIY repairers is skipping straight to hardware. They pull the phone apart, replace the most likely part, and then find the fault is still there. Software diagnostics feel like a slow detour, but they genuinely save you from that loop. Running software diagnostics first avoids invasive hardware repairs when the issue is software-related. I have seen phones returned to full function by a factory reset that would otherwise have had a new display fitted.
Cold testing is where patience pays off most. The temptation is to rush to hot testing because it feels more active. But a missed short during cold testing can destroy a PMIC the moment you connect power. I always spend at least ten minutes on cold testing before I connect any supply, even on a board I have worked on before.
The other thing I would say is that schematics matter. Testing without a schematic is like reading a map with no street names. Free schematic resources exist for most iPhone and Samsung Galaxy models, and they transform your ability to interpret multimeter readings. If you are serious about diagnosing phone issues at component level, learning to read a schematic is the single skill that will advance you fastest.
Progress is gradual. Your first cold test will feel uncertain. Your tenth will feel routine. The method does not change; your confidence in reading the results does.
— Adewale
Get the right parts and tools from Buy2fix
Buy2fix is a UK-based specialist supplier of mobile repair parts and accessories for brands including iPhone, Samsung Galaxy, Huawei, Xiaomi, and OPPO. Whether you need a replacement charging port, a new display assembly, or accessories to support your repair workflow, Buy2fix stocks quality-checked components with free UK mainland shipping and a 30-day return policy. If you have diagnosed a faulty component using the methods in this guide, the next step is sourcing a reliable replacement. Visit Buy2fix to browse the full range of mobile repair parts and get your device back in working order.
FAQ
What is the safest way to start testing mobile components?
Start with software diagnostics using built-in codes or apps like TestM, then move to cold multimeter testing on an unpowered device. This order reduces the risk of causing further damage before you understand the fault.
What does a reading of 0.000 mean during cold testing?
A reading of 0.000 in diode mode indicates a short to ground on that pin or component. Do not power the device on until you have identified and resolved the short.
What voltage should a healthy battery connector read?
A healthy battery connector reads between 3.7V and 4.4V during hot testing. A reading outside this range points to a battery fault or a problem with the power management IC.
Can I test mobile components without a multimeter?
You can run software diagnostics and visual inspections without a multimeter, but you cannot confirm electrical faults. A digital multimeter is the minimum tool required for reliable hardware component testing.
How do I know if a phone has a major short circuit?
A current draw spike above 2 amps on a DC power supply connected to the battery rail is a definitive indicator of a major short circuit. This level of fault requires board-level repair rather than a standard component replacement.
Recommended
Let customers speak for us
Well made part very strong easy to fit great value for the money

Well packed, with fast shipping :)

Exactly what the doctor ordered…great color, comfort, and durability. Trust this watch band!

Brilliant strap, second purchase, bought bracelet before. Excellent value. Thank you

Great item for splitting your Audio signal

Outstanding product!
Next level customer service.

Very satisfied but the delivery needs to get more faster...

Good price,quick delivery

Best phone case ever! This is my second one as I broke my first. Would defo recommend

Great fitting Apple Watch bands

For Apple Watch Ultra 3 / 2 / 1 49mm RedPepper Armor Metal Case Integrated Silicone Watch Band(Steel Black White)

Good price and quick postage

Perfect fit.

Absolutely necessary

Second Purchase and still a very happy customer. Keep up the good work.
