

Your guide to repair small parts in electronics
TL;DR:
- Diagnose thoroughly with visual inspection and testing before replacing components to prevent costly mistakes.
- Use proper tools, grounded ESD protection, and controlled soldering techniques to ensure successful, reliable small parts repairs.
If you have ever replaced a component only to find the problem persists, you have already discovered the most common trap in DIY electronics repair. A solid guide to repair small parts is not just about swapping out what looks broken. It is about diagnosis first, technique second, and sourcing quality components third. Done in the right order, small parts repair genuinely extends the life of your devices and keeps real money in your pocket. Get the order wrong, and you risk compounding a minor fault into something far more expensive to fix.
Table of Contents
- Key takeaways
- Your guide to repair small parts: tools and workspace
- Diagnosing faults before you touch anything
- Soldering basics for small component repair
- Selecting and installing replacement components
- Post-repair testing and troubleshooting
- My honest take on fixing small electronics parts
- Get the right parts from Buy2fix
- FAQ
Key takeaways
| Point | Details |
|---|---|
| Diagnose before you replace | Visual inspection and multimeter checks should always precede any part replacement to avoid costly mistakes. |
| ESD protection must be grounded | A wrist strap or mat without a proper ground connection offers no real protection against electrostatic damage. |
| Temperature control matters in soldering | Matching your iron temperature to the solder alloy specification prevents pad lifting and component damage. |
| Read the datasheet first | Confirming component values, pinouts, and voltage ratings before installation prevents orientation errors and device failure. |
| Know when to stop | Fine-pitch SMD work and multi-layer board faults are beyond most DIY setups. Recognising your limits protects the device. |
Your guide to repair small parts: tools and workspace
Getting the workspace right before you touch a single component is one of the most overlooked steps in any repairing minor parts guide. The right tools do not just make the job easier. They are the difference between a successful repair and an irreparable board.
Here is what you need at minimum:
- Temperature-controlled soldering iron. A fixed-wattage iron gives you no control. A station with adjustable temperature lets you match heat to the job.
- Quality solder and flux. Electronics-grade flux is not optional. It cleans the joint surface, promotes bonding, and prevents corrosion. Rosin-core solder is the standard starting point.
- Digital multimeter. Non-negotiable. Voltage measurement, continuity checks, and component testing all depend on it.
- Fine-tipped tweezers. For surface-mount work, a decent pair of stainless tweezers is worth every penny.
- Magnification. A loupe or a digital microscope makes small component work manageable. Squinting at a 0402 resistor without magnification causes mistakes.
- ESD wrist strap and anti-static mat. This is where many DIYers cut corners. ESD protection grounded correctly uses a 1 Megaohm resistor in the ground path to safely dissipate charge. A strap worn but not connected to ground does nothing useful.
Good lighting deserves its own mention. An adjustable LED task lamp positioned at an angle will reveal cold solder joints, lifted pads, and hairline cracks that direct overhead light completely misses.
Pro Tip: Use a magnetic screw tray or a printed paper template of the device to keep each screw in the exact position it came from. Swapping screw lengths on a device like an iPhone is an easy way to cause permanent damage on reassembly.
For a detailed list of what tools belong in your kit, the mobile repair tools guide at Buy2fix covers the fundamentals well.
Diagnosing faults before you touch anything
Experienced technicians spend more time diagnosing than repairing. That ratio is not inefficiency. It is exactly what makes their repairs succeed where DIY attempts often fail. Most repair disasters follow a predictable pattern: part replaced, problem unchanged, confidence shaken.
Follow this fault-finding sequence before any small parts troubleshooting turns into part replacement:
- Visual inspection first. Look for burnt resistors, cracked or lifted solder joints, swollen capacitors, corrosion around connectors, and any discolouration on the PCB. These tell you where to focus your testing.
- Check for obvious damage. A cracked trace or a physically broken component usually points you straight to the fault without any test equipment.
- Power rail voltage checks. Use your multimeter to confirm that supply rails are within specification. A dead rail upstream explains a lot of downstream symptoms.
- Continuity and resistance testing. Multimeter continuity tests identify broken connections and out-of-specification passive components that look fine visually.
- Symptom mapping. Cross-reference what the device does or does not do against the circuit’s known failure modes. A phone that charges intermittently points to a different fault area than one that will not power on at all.
Pro Tip: Write down every test result as you go. Fault-finding is iterative, and without notes you will repeat tests and lose track of what you have already ruled out.
This methodical approach is exactly what separates confident DIY repair from frustrating guesswork.
Soldering basics for small component repair
Soldering is where the majority of DIY small parts repairs go wrong. The single biggest misconception is that more heat produces a better joint. In practice, excessive heat damages joints just as reliably as too little does. The target is controlled, brief heat application at the right temperature.
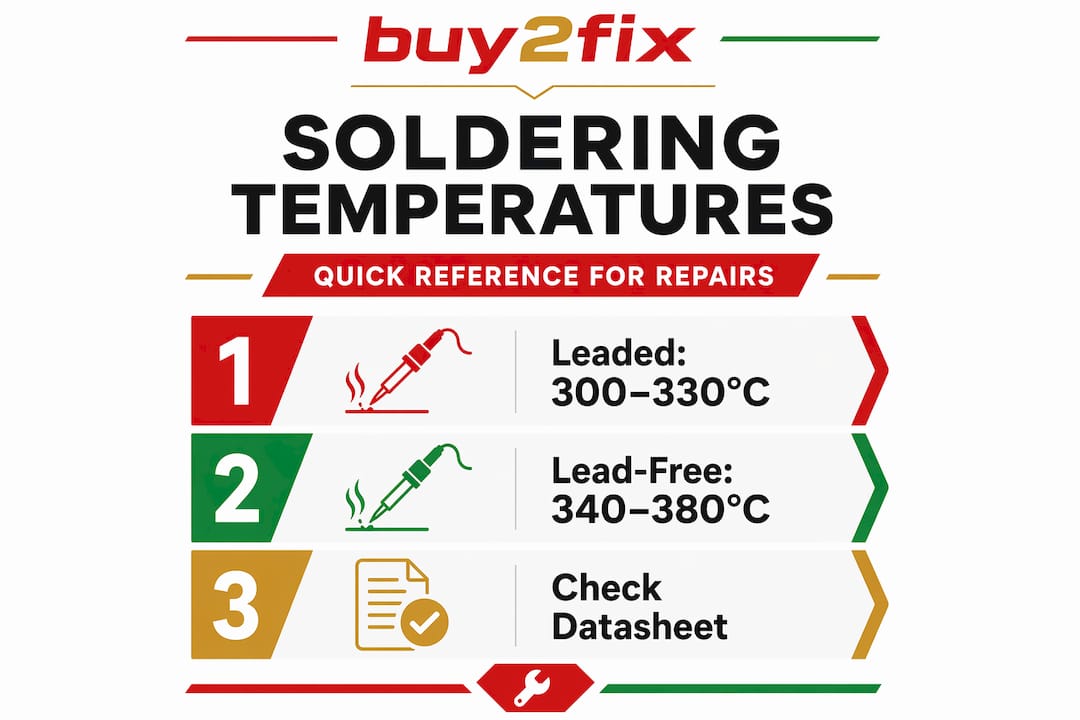
Choosing your temperature
Leaded solder (60/40 or 63/37 tin/lead) melts at around 183°C and works well at iron tip temperatures of 300 to 330°C. Lead-free solder, which is far more common in modern devices, has a higher melting point and typically needs 340 to 380°C depending on the alloy. Going above these ranges does not speed things up. It burns flux before it can do its job and risks lifting pads or cracking joints on cooling.
Good joints versus cold or damaged joints
A good solder joint is shiny (for leaded) or slightly matte with smooth contours (for lead-free). It wets cleanly around the pad and component lead. A cold joint looks dull, grainy, or blobby. An overheated joint may show burnt flux residue or a disturbed pad. Neither will give you reliable electrical contact long-term.
“Microsoldering requires understanding heat transfer, not just iron temperature. Hot air rework tools and properly grounded ESD systems are standard requirements when working on surface-mount components at this level.”
Through-hole versus surface-mount technique
Through-hole repair is more forgiving. You have a physical lead to hold the component in place and more thermal mass to work with. Surface-mount work, especially on fine-pitch or QFN-packaged ICs, demands hot air equipment, proper flux application, and a steady hand. Common mistakes that damage PCB pads include:
- Holding the iron on the pad too long
- Using too much solder and bridging adjacent pads
- Removing components by pulling before the solder has fully melted
- Applying heat without flux, which increases the force needed and raises the risk of pad lifting
If you are new to surface-mount work, practise on a scrap board before attempting a repair on a device you care about.
Selecting and installing replacement components
You have diagnosed the fault. Now you need the right part. This is where step-by-step small repairs often unravel, because “close enough” in electronics frequently means “it will fail again soon.”
How to match a replacement component
| What to check | Why it matters |
|---|---|
| Component value | Wrong resistance, capacitance, or inductance changes circuit behaviour |
| Voltage and current rating | An under-rated part may function briefly, then fail under load |
| Package type | SMD and through-hole are not interchangeable on most boards |
| Pinout and orientation | Datasheet verification prevents reversed polarised capacitors and transistors |
| Tolerance rating | Critical in timing and filtering circuits where precision matters |
Polarised components demand particular care. A capacitor installed backwards will likely fail and may do so dramatically. Transistors with swapped base and collector pins will not function and may damage the surrounding circuit on power-up.
Before installing any part, check for signs of thermal stress like PCB browning or melted insulation nearby. Replacing the component without addressing the root cause of overheating means the new part will fail too. Reapply thermal paste to heatsinks where applicable, and check that airflow paths are clear before closing the device.
For sourcing parts, reliability matters more than price. The common small part replacements guide at Buy2fix covers the most frequently needed components for mobile devices and where to find quality stock.
Pro Tip: Cross-reference the part number from the original component with at least one independent datasheet source before ordering. Counterfeit passives are more common than most people realise, and a matching part number does not always guarantee the same specifications.
Post-repair testing and troubleshooting
Reassembling a device without a structured test is a missed opportunity and a real risk. Small component maintenance tips are only useful if you verify the repair has actually worked.
- Visual check before power-on. Inspect every joint you touched. Look for bridges, unsoldered pads, and any foreign matter on the board.
- Limited power-up. If possible, use a bench power supply with a current limit set to a safe level before connecting a battery. Abnormal current draw immediately flags a fault.
- Functional testing. Test the specific symptom that prompted the repair and surrounding functions. A replaced charging IC should be tested with charge current measurement, not just a quick phone-on check.
- Multimeter verification. Voltage and continuity checks confirm supply rails are correct and no new faults have been introduced.
- Intermittent fault check. Run the device through its normal operating cycle, including thermal cycling if the original fault was heat-related. Intermittent faults often only show up under load or temperature.
DIY repairs are feasible for most through-hole and straightforward surface-mount work. However, fine-pitch ICs, multi-layer board faults, and anything in a safety-critical power circuit are genuinely better handled by a professional. Knowing where your current skills and equipment end is not a failure. It is good judgement.
My honest take on fixing small electronics parts
In my experience, the biggest barrier to successful DIY repair is not skill. It is patience. I have seen capable people destroy repairable devices simply because they rushed the diagnosis stage. Swapping parts at random is expensive and demoralising, and yet it is the default approach for most first-timers.
What I have found actually works is treating the diagnostic phase as the main event, not a preamble. If your diagnosis is thorough, the repair itself is often straightforward. The opposite is never true.
The second thing I would tell any enthusiast is this: invest in your tools before you invest in practice. A cheap soldering iron with no temperature control will teach you bad habits and ruin more boards than it fixes. Spend the money on a decent station and you will get better results from day one.
There is also a myth worth addressing: that small parts repair is inherently risky and likely to make things worse. For most through-hole repairs and common SMD components, the risk is manageable if you follow proper technique. The devices most at risk are the ones where someone applied maximum heat and minimum thought.
Accept the learning curve. Your first few repairs will take twice as long as expected and you will make small mistakes. That is exactly how the skill builds.
— Adewale
Get the right parts from Buy2fix
If this repair guide for little things has you ready to start your next repair, having quality parts on hand makes the whole process easier. Buy2fix stocks replacement parts and tools for iPhone, Samsung Galaxy, Huawei, Xiaomi, OPPO, and a broad range of other devices, all checked before dispatch and shipped free to UK mainland addresses. The Buy2fix blog also carries practical guides covering reliable smartphone replacement parts and sourcing advice tailored for UK DIYers. Whether you are replacing a battery, a charging port, or a screen assembly, Buy2fix has the inventory and the support to back your repair.
FAQ
What tools do I need to start repairing small electronics parts?
At minimum you need a temperature-controlled soldering iron, digital multimeter, quality flux and solder, fine tweezers, magnification, and a properly grounded ESD wrist strap and mat. These give you the foundation for safe and accurate small component repair.
Why should I diagnose a fault before replacing any component?
Replacing parts without diagnosis is the most common cause of failed DIY repairs. Visual inspection and multimeter checks confirm the actual fault so you replace only what is broken, saving time and money.
What temperature should I solder at for small electronic components?
Leaded solder works well at iron tip temperatures of 300 to 330°C. Lead-free solder typically requires 340 to 380°C. Exceeding these ranges burns flux and risks lifting PCB pads, while insufficient heat produces cold joints.
How do I know if a replacement component is the correct one?
Check the original component’s part number against a datasheet to verify the value, voltage rating, package type, pinout, and tolerance before ordering. Installing a part with the wrong rating or orientation can cause immediate device failure.
When should I stop a DIY repair and seek professional help?
Fine-pitch surface-mount ICs, multi-layer board faults, and safety-critical power circuits are beyond most DIY setups. If your diagnosis points to any of these, professional repair is the more reliable and cost-effective choice.
Recommended
Let customers speak for us
For Samsung Galaxy A26 SM-A266B Original Earpiece Speaker with Cable

Very good communication throught. Good product

Well made part very strong easy to fit great value for the money

Well packed, with fast shipping :)

Exactly what the doctor ordered…great color, comfort, and durability. Trust this watch band!

Brilliant strap, second purchase, bought bracelet before. Excellent value. Thank you

Great item for splitting your Audio signal

Outstanding product!
Next level customer service.

Very satisfied but the delivery needs to get more faster...

Good price,quick delivery

Best phone case ever! This is my second one as I broke my first. Would defo recommend

Great fitting Apple Watch bands

For Apple Watch Ultra 3 / 2 / 1 49mm RedPepper Armor Metal Case Integrated Silicone Watch Band(Steel Black White)

Good price and quick postage

