

Can a cracked iPad screen be fixed? Your 2026 guide
TL;DR:
- A cracked iPad screen can often be repaired through professional services or DIY methods, with costs varying based on the model and damage extent. Repairs are generally more feasible on older, non-fused displays, while newer laminated screens pose higher risks and require specialized tools. Repairing an existing device is usually more cost-effective and environmentally friendly than replacement, especially for iPads under six years old.
A cracked iPad screen can be repaired through either professional services or a do-it-yourself approach, though the method and complexity depend entirely on your iPad model and the extent of the damage. Professional repair in 2026 typically costs between £65 and £280 and takes as little as 30 minutes, while sourcing your own parts for a DIY fix can bring that figure down to £25 to £80. The good news is that for most iPad owners, a cracked screen does not mean writing off the device. Repair is almost always worth considering before replacement, particularly if your iPad is less than six years old.
Can a cracked iPad screen be fixed, and what affects the answer?
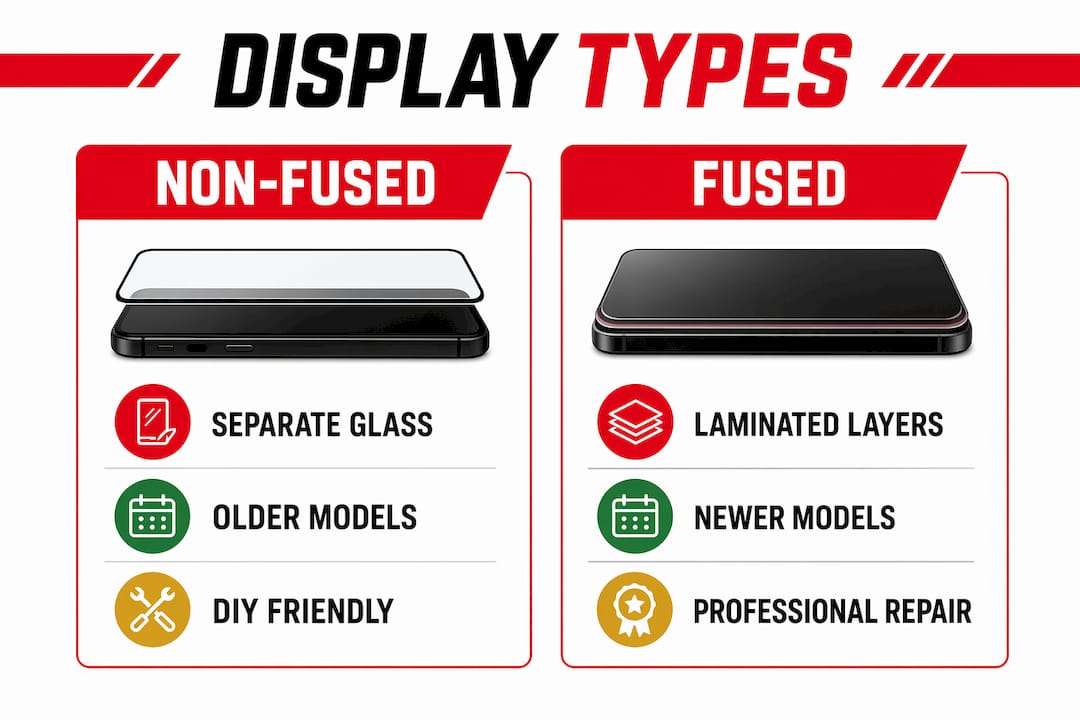
The short answer is yes, but the longer answer depends on one critical factor: whether your iPad uses a fused or non-fused display. This distinction shapes everything from the cost of repair to whether a DIY attempt is realistic at all.
Non-fused displays, found on older and budget iPad models, have the glass digitiser sitting separately from the LCD panel beneath. This means a technician or confident DIYer can replace just the glass layer without disturbing the LCD. The repair is cheaper and more forgiving.
Modern iPads use fused display technology, where the glass, digitiser, and LCD are bonded together into a single laminated assembly. Separating these layers without destroying them is extremely difficult. Attempting to replace only the glass on a fused display almost always destroys the internal layers, making full assembly replacement the only viable option. That full assembly costs more and requires greater precision to install.
Fused vs non-fused: a quick comparison
| Feature | Non-fused display | Fused (laminated) display |
|---|---|---|
| Models | iPad 7th to 9th generation and older | iPad Air, iPad Pro, iPad Mini 5th gen onwards |
| Glass-only repair possible? | Yes | No |
| DIY difficulty | Moderate | High to very high |
| Typical parts cost | Lower | Higher |
| Risk of LCD damage during repair | Low | High without specialist tools |
Pro Tip: Before ordering any parts, confirm your exact iPad model by going to Settings > General > About. The model number there will tell you whether you have a fused or non-fused screen, which changes everything about your repair plan.
Professional vs DIY repair: which is right for your iPad?
Choosing between professional repair and doing it yourself comes down to three things: your iPad model, your technical confidence, and how much you value your warranty.

What professional repair actually costs
Professional iPad screen repair in 2026 runs from around £65 to £280 depending on the model, with Apple’s own repair service sitting at the higher end. Third-party specialists, including many UK high street repair shops, typically charge less and can complete most repairs within 30 to 150 minutes. Apple-authorised repairs preserve your warranty and use genuine parts, but independent shops often offer competitive pricing with their own service guarantees.
Professional repairs carry warranties that DIY simply cannot match. If the screen develops a fault within the warranty period, you are covered. That peace of mind has real value, particularly for iPads used daily for work or education.
The real risks of DIY on newer models
DIY repair is practical mainly for older, non-fused models such as the iPad 7th to 9th generation, and only for users with some prior experience of electronics repair. On newer fused models, the risks multiply quickly.
The most serious risk involves biometric sensors. Newer iPads require Apple’s Repair Assistant software after screen replacement to restore Face ID or Touch ID functions. Without it, these features can be permanently disabled. An unauthorised or DIY repair also voids your Apple warranty entirely, which matters if your device is still relatively new.
Here is a summary of the key considerations before choosing your repair path:
- Model age and screen type. Non-fused models are far more DIY-friendly than modern laminated assemblies.
- Warranty status. If your iPad is still under Apple warranty or covered by AppleCare+, professional repair through Apple is almost always the better financial decision.
- Biometric features. Face ID and Touch ID recalibration after a screen swap requires Apple’s own software tools, which independent repairers may or may not have access to.
- Your skill level. Opening an iPad requires heat guns or heat plates, plastic pry tools, suction cups, and a steady hand. Professional repair shops use specialist heat plates and clean environments that most home repairers cannot replicate.
- Cost of mistakes. A failed DIY attempt on a fused display can turn a £70 repair into a £300 replacement. DIY novice attempts on fused displays often result in higher total costs than simply going professional from the start.
Pro Tip: If your iPad is under AppleCare+, your screen repair excess fee is typically far lower than the cost of a third-party repair. Check your coverage in the Apple Support app before spending anything.
How to assess the damage on your cracked iPad screen
Not all cracked screens are equal. Before you commit to a repair route, spend five minutes assessing what is actually broken. The type of damage determines the repair scope and cost.
-
Check the touch response. Swipe across the screen in different areas. If touch input is unresponsive or erratic in certain zones, the digitiser layer is damaged. This is common with impact cracks and means the screen assembly needs replacing, not just cosmetic repair.
-
Look for LCD symptoms. Signs of LCD damage include black spots, coloured lines, flickering, and a black screen despite the device still producing sounds or vibrations. If you can hear notifications but see nothing, the LCD has failed. This is a more serious repair than glass damage alone.
-
Inspect the crack pattern. A single hairline crack with no touch issues and a fully functioning display is the least serious scenario. Spider-web cracking across the whole screen, particularly near the corners, suggests significant impact and a higher likelihood of digitiser or LCD involvement.
-
Act quickly. Cracks worsen over time due to thermal changes and pressure, and a compromised screen seal allows moisture and dust to reach internal components. A small crack left unrepaired for weeks can lead to far more expensive damage than the original break.
-
Test the front camera and sensors. On iPad Pro and iPad Air models with Face ID, check that the front camera still functions normally. Cracks near the top of the screen can damage the sensor array, which complicates repair significantly.
Practical steps for DIY iPad screen repair
If you have assessed your iPad and decided that a DIY repair is realistic, preparation is everything. Rushing into a screen replacement without the right tools or parts is the most common cause of failed repairs.
-
Confirm your model before buying parts. iPad screen assemblies are not interchangeable between generations. A part listed for the iPad 8th generation will not fit the iPad 9th generation correctly. Use your model number from Settings to source the exact assembly.
-
Source quality parts. Cheap, unbranded screen assemblies frequently have poor colour accuracy, weak touch sensitivity, and short lifespans. Buy from reputable UK suppliers who specify the grade and origin of their parts. Buy2fix stocks iPad screen replacement parts with quality checks before dispatch, which matters when you are trusting a part to last.
-
Gather the right tools. You will need a heat gun or heat mat to soften the adhesive, plastic pry tools and a suction cup to lift the screen, a Phillips and pentalobe screwdriver set, and tweezers for ribbon cables. Metal tools near the LCD will scratch or crack it.
-
Handle adhesive with care. Careful adhesive removal and high-quality replacement adhesive are critical to preserving the device’s seal and long-term durability. Factory adhesives are highly specialised. Poor substitutes leave gaps that allow dust and moisture inside.
-
Follow a model-specific guide. Generic repair tutorials miss the nuances of individual iPad generations. The iPad Mini DIY repair guide from Buy2fix is a good example of the model-specific detail you need before starting. For broader tablet repair context, the UK tablet screen replacement guide covers sourcing and safety tips that apply across models.
-
Disconnect the battery first. Before touching any ribbon cables or internal components, disconnect the battery connector. Failing to do so risks short-circuiting the logic board, which is an irreversible and expensive mistake.
Key takeaways
A cracked iPad screen is repairable in almost every case, but the right method depends on your model’s screen type, the damage extent, and your willingness to accept repair risks.
| Point | Details |
|---|---|
| Repair is usually worth it | Repairing is more cost-effective than replacement for iPads younger than six years. |
| Screen type determines method | Fused displays require full assembly replacement; non-fused models allow glass-only repair. |
| DIY suits older models only | Non-fused iPads (7th to 9th generation) are the most realistic candidates for home repair. |
| Warranty and biometrics matter | Unauthorised repairs void Apple warranty and may permanently disable Face ID or Touch ID. |
| Act promptly | Delaying repair allows cracks to worsen and internal damage to accumulate. |
My view on when to put the screwdriver down
I have seen a lot of DIY repair attempts go wrong, and the pattern is almost always the same. Someone watches a 10-minute video, orders a cheap part, and opens their iPad Pro with a metal spudger. Twenty minutes later, they have a cracked LCD on top of a cracked glass, and the repair bill has doubled.
The honest truth is that DIY iPad screen repair is genuinely satisfying and cost-effective on the right model. An iPad 8th generation with a cracked glass and a functioning LCD is a reasonable DIY project for anyone who has replaced a phone screen before. But a 2022 iPad Air with a fused display, Face ID, and an active warranty? That is a job for a professional, full stop.
What I find most people underestimate is the adhesive. Getting the screen off without damaging the LCD requires patience and the right temperature. Getting it back on with a proper seal requires quality adhesive and even pressure. Both steps are where amateur repairs most often fail, and both steps are where professional shops earn their fee.
Repairing rather than replacing also preserves your data, reduces electronic waste, and extends the device’s usable life. That is worth something beyond the financial saving. Whatever route you choose, take the time to assess the damage properly, understand your model, and source parts that will actually last.
— Adewale
Get your iPad screen repair sorted with Buy2fix
Buy2fix supplies quality iPad screen assemblies and repair parts to both DIY buyers and professional technicians across the UK. Whether you are replacing the screen on an older non-fused iPad or sourcing a full laminated assembly for a newer model, Buy2fix carries parts with quality checks before dispatch, free UK mainland shipping, and a 30-day return policy. Browse the full range of iPad repair parts to find the correct assembly for your model. If you want guidance before you start, the Buy2fix repair blog covers model-specific tips and common pitfalls to help you get the job done right the first time.
FAQ
Can an iPad screen be replaced at home?
Yes, but only realistically on older non-fused models such as the iPad 7th to 9th generation. Newer fused display models carry a high risk of LCD damage and biometric sensor failure during DIY repair.
Does fixing a cracked iPad screen void the warranty?
Any unauthorised or DIY repair voids your Apple warranty. Newer models also require Apple’s Repair Assistant software after a screen replacement to restore Face ID or Touch ID, which only authorised repairers can access.
How much does iPad screen repair cost in the UK?
Professional iPad screen repair in the UK typically ranges from around £65 to £280 depending on the model. DIY parts generally cost between £25 and £80, though this saving must be weighed against the risk of further damage.
What are the signs that my iPad LCD is damaged, not just the glass?
LCD damage presents as black spots, coloured lines, flickering, or a completely black screen while the device still produces sounds. If touch and display both work normally, the damage may be limited to the outer glass.
Is it worth repairing a cracked iPad screen or buying a new one?
Repair is worth it for most iPads under six years old. It preserves your data, costs significantly less than a new device, and avoids the setup time of starting fresh on new hardware.
Recommended
Let customers speak for us
Well made part very strong easy to fit great value for the money

Well packed, with fast shipping :)

Exactly what the doctor ordered…great color, comfort, and durability. Trust this watch band!

Brilliant strap, second purchase, bought bracelet before. Excellent value. Thank you

Great item for splitting your Audio signal

Outstanding product!
Next level customer service.

Very satisfied but the delivery needs to get more faster...

Good price,quick delivery

Best phone case ever! This is my second one as I broke my first. Would defo recommend

Great fitting Apple Watch bands

For Apple Watch Ultra 3 / 2 / 1 49mm RedPepper Armor Metal Case Integrated Silicone Watch Band(Steel Black White)

Good price and quick postage

Perfect fit.

Absolutely necessary

Second Purchase and still a very happy customer. Keep up the good work.
