

Tablet screen replacement guide: UK DIY repair tips
Replacing a tablet screen yourself can save up to 75% compared to professional repairs, yet many UK enthusiasts hesitate due to fears of complexity or causing further damage. This guide cuts through common misconceptions, offering reliable techniques and practical steps tailored for DIY repairers and technicians. Whether you’re tackling a hairline crack or a shattered display, understanding the right tools, quality parts, and safe procedures transforms what seems daunting into a manageable, cost-effective repair that preserves your device’s integrity and extends its lifespan.
Table of Contents
- Key takeaways
- Understanding tablet screen damage and repair basics
- Choosing quality replacement parts and safe techniques
- Avoiding pitfalls and addressing challenges in DIY screen replacement
- Cost comparison and practical tips for UK DIY screen replacement
- Explore Buy2Fix tools and parts for confident tablet repairs
- FAQ
Key Takeaways
| Point | Details |
|---|---|
| Standard repair steps | Power off the device, heat to loosen adhesive, pry off the old screen with plastic tools and suction cups, disconnect flex cables, install the new screen with fresh adhesive and test. |
| Quality replacement parts | OEM or high grade screens ensure accurate touch, colour and durability, whereas budget parts may suffer poor response or premature failure. |
| Safety and frame checks | Work on an anti static mat with an ESD strap and check the frame for warping before fitting the new screen. |
| Warranty considerations | DIY repairs can void warranties and may be riskier for complex faults where professional repair is safer. |
Understanding tablet screen damage and repair basics
Tablet screens suffer various damage types, each requiring specific repair approaches. Hairline cracks often result from minor impacts and may not affect touch functionality immediately, whilst spider web cracks indicate more severe trauma that typically impairs display clarity and responsiveness. Touch issues without visible damage suggest digitiser failure, requiring complete screen assembly replacement. Recognising these distinctions helps you assess repair feasibility and choose appropriate replacement parts.
Standard mechanics for tablet screen replacement include powering off the device, heating to loosen adhesive, prying off the old screen with plastic tools and suction cups, disconnecting flex cables, cleaning residue, installing new screen assembly, reconnecting cables, applying new adhesive, and testing. This systematic approach minimises risk whilst ensuring proper installation. Each step demands precision: rushing through heating causes LCD damage, whilst improper cable disconnection can render the device unusable.
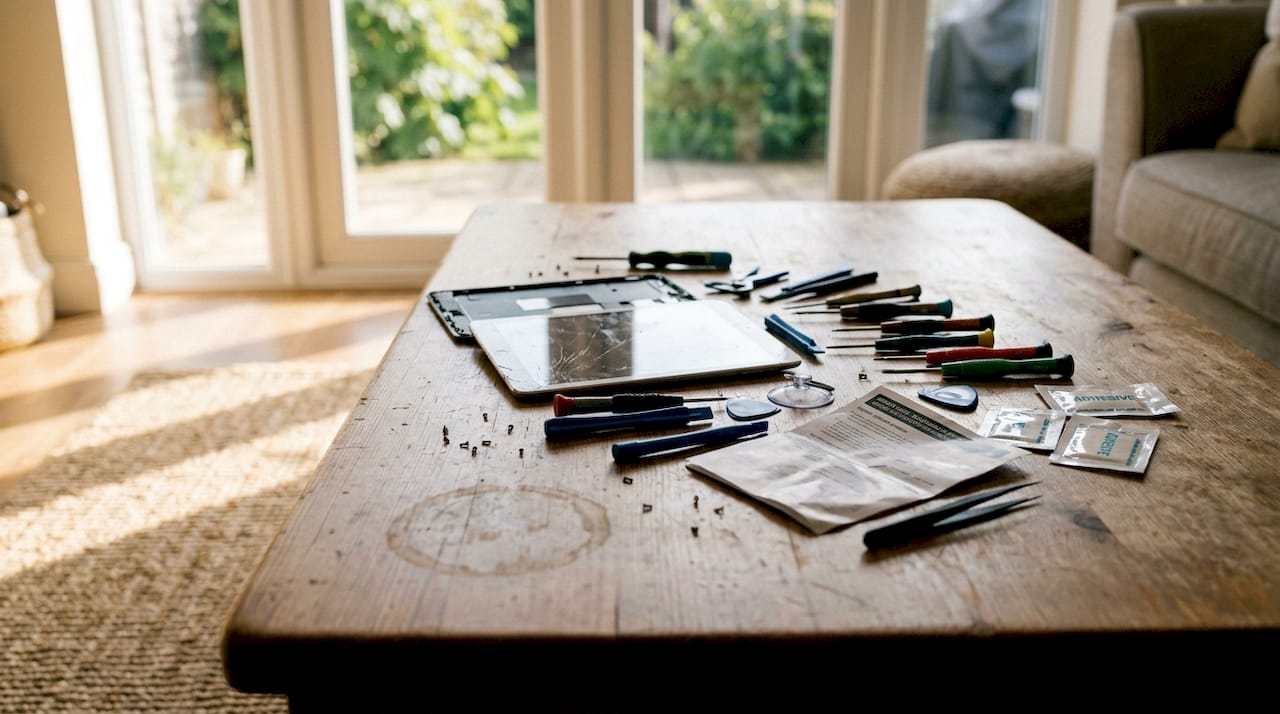
Essential tools form your repair foundation. You’ll need precision screwdrivers matched to your tablet’s fasteners, plastic pry tools to avoid scratching internal components, suction cups for controlled screen lifting, and a heat source like a heat gun or mat. Additional items include isopropyl alcohol for adhesive removal, microfibre cloths, tweezers for small components, and replacement adhesive strips. Investing in quality tools prevents common tablet repair mistakes that compromise repair outcomes.
Cleaning adhesive residue thoroughly before installing the new screen ensures proper bonding and maintains water resistance. Old adhesive leaves sticky residue that attracts dust and prevents new adhesive from seating correctly. Use isopropyl alcohol and plastic scrapers to remove all traces without scratching the frame. Replacing adhesive strips restores the original seal, protecting internal components from moisture and dust intrusion.
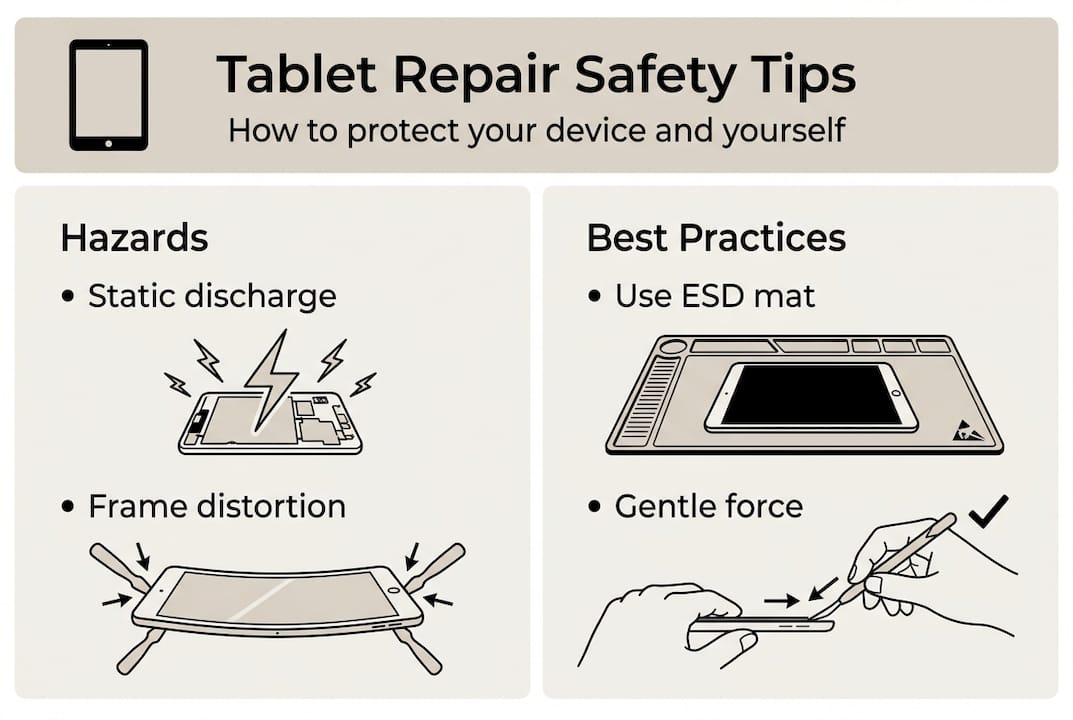
Common hazards include static discharge damaging sensitive circuits and frame distortion from excessive force. Always work on an anti-static mat and wear an ESD wrist strap. Inspect the frame for warping before installing the new screen, as even slight bends prevent proper seating and cause touch issues. Taking time to address these fundamentals establishes a solid repair foundation.
Choosing quality replacement parts and safe techniques
Part quality directly impacts repair longevity and device performance. OEM screens match original specifications precisely, ensuring colour accuracy, touch sensitivity, and durability. High-quality aftermarket alternatives offer cost savings whilst maintaining acceptable performance, but budget screens often suffer from poor touch response, colour shift, and premature failure. Prioritise OEM or high-grade screens, heat carefully between 70-90°C to avoid LCD damage, always backup data first, and check local UK services for parts.
Verifying screen compatibility prevents costly mistakes. Tablet models often have multiple revisions with different screen connectors or dimensions. Cross-reference your device’s exact model number with supplier specifications, checking connector type, screen size, and digitiser technology. Purchasing incompatible parts wastes money and delays repairs, whilst correct parts ensure seamless installation.
Proper heating technique separates successful repairs from disasters. Apply heat evenly across the screen edges where adhesive bonds strongest, maintaining temperatures between 70-90°C. Heat guns require constant motion to prevent hotspots, whilst heat mats provide consistent, controlled warming. Insufficient heat makes adhesive removal difficult, increasing breakage risk, whilst excessive heat damages LCD layers or warps plastic frames. Test temperature with an infrared thermometer for precision.
Pro Tip: Before starting any repair, backup all data to cloud storage or a computer. Screen replacement occasionally triggers unexpected issues requiring factory resets, and protecting your data prevents devastating losses.
Safe handling practices preserve device integrity throughout the repair. Work in a clean, well-lit area free from clutter. Organise removed screws by location using a magnetic mat or labelled containers, as mixing fasteners causes reassembly confusion. Handle flex cables by their connectors, never pulling on the thin ribbons themselves. Disconnecting cables requires gentle upward pressure on the connector latch, not forceful tugging. These careful practices, combined with cost-effective tablet repair strategies, maximise success rates.
ESD protection cannot be overstated. Static electricity invisible to humans carries thousands of volts capable of destroying microscopic circuits instantly. Wear an ESD wrist strap connected to a proper ground, work on an anti-static mat, and store components in anti-static bags. These simple precautions prevent invisible damage that manifests as mysterious malfunctions weeks after repair.
Avoiding pitfalls and addressing challenges in DIY screen replacement
DIY repairs offer substantial savings but introduce risks requiring honest assessment. DIY repair saves money but carries risks including further device damage, battery hazards, and voided warranties, whilst professional repairs offer safety guarantees and warranty protection. Manufacturers often void warranties when detecting unauthorised repairs, leaving you responsible for subsequent failures. Weigh potential savings against warranty value and your skill level before proceeding.
Common mistakes plague inexperienced repairers. Applying excessive force when prying screens causes frame damage or shatters replacement screens before installation. Using metal tools near batteries risks puncture and fire. Improper adhesive application leaves gaps allowing dust and moisture intrusion. Neglecting cable connections during reassembly results in non-functional screens or other components. Each mistake teaches expensive lessons, making careful technique essential from the start.
Safe disassembly and reassembly follow a logical sequence:
- Power off completely and remove SIM cards or memory cards
- Heat screen edges evenly to soften adhesive
- Insert plastic pry tool at a corner, working slowly around the perimeter
- Lift screen gradually using suction cup, watching for cable resistance
- Disconnect battery first to eliminate shock risk
- Photograph cable connections before disconnecting for reassembly reference
- Remove old screen and clean all adhesive residue from frame
- Test new screen before final installation
- Apply new adhesive strips precisely along frame edges
- Reconnect cables in reverse order, battery last
- Seat screen carefully, ensuring even pressure around edges
- Power on and test all functions before sealing completely
This methodical approach prevents rushed mistakes whilst ensuring nothing gets overlooked. Documenting each step with photos provides invaluable reassembly guidance.
Pro Tip: When transferring components like home buttons with Touch ID, handle them with extreme care. These paired security components cannot be replaced without losing functionality, and damaging them during transfer necessitates professional intervention.
Edge cases require special consideration. Tablets with embedded batteries demand extra caution, as puncturing lithium cells causes violent fires. Models with extensive internal adhesive benefit from prolonged heating and patience. Water-damaged devices need thorough cleaning and drying before screen replacement to prevent corrosion. Recognising when repairs exceed your skill level protects both your safety and your device. Understanding tablet repair challenges specific to the UK market helps set realistic expectations.
“The difference between a successful DIY repair and a costly disaster often comes down to patience and preparation. Rushing through steps or skipping safety measures turns a manageable repair into an expensive lesson.”
Knowing when to seek professional help demonstrates wisdom, not weakness. Complex repairs involving motherboard components, extensive water damage, or battery replacement often cost more to fix after failed DIY attempts than hiring professionals initially. Reputable technicians carry insurance, use specialised equipment, and offer warranties on their work. When repair complexity or risk exceeds your comfort level, professional services provide peace of mind worth their cost.
Cost comparison and practical tips for UK DIY screen replacement
UK iPad screen repair costs range from £120 to £400 depending on model, whilst DIY saves up to 75% compared to professional services. Older iPad models like the iPad Air 2 typically cost £120-£180 professionally, whilst newer iPad Pro repairs reach £300-£400 due to advanced display technology. Samsung Galaxy Tab repairs follow similar patterns, with budget models costing £100-£150 and premium tablets reaching £250-£350 for professional screen replacement.
| Tablet Model | Professional Repair Cost | DIY Parts Cost | Potential Savings |
|---|---|---|---|
| iPad Air 2 | £120-£180 | £30-£50 | £70-£150 (58-83%) |
| iPad Pro 11" | £280-£350 | £80-£120 | £160-£270 (57-77%) |
| Samsung Tab A | £100-£140 | £25-£40 | £60-£115 (60-82%) |
| Samsung Tab S7 | £220-£300 | £70-£100 | £120-£230 (55-77%) |
DIY savings prove substantial across all models, with careful repairers recovering costs after just one or two successful repairs. Initial tool investment adds £20-£50 depending on quality, but these tools serve multiple repairs, improving cost-effectiveness over time.
Finding affordable, reliable parts in the UK requires research. Established suppliers like Buy2Fix offer quality-tested components with warranties, whilst marketplace sellers provide cheaper alternatives with variable quality. Verify seller ratings, return policies, and part compatibility before purchasing. Genuine OEM parts command premium prices but guarantee perfect fit and performance. High-quality aftermarket screens from reputable brands offer the best value balance for most repairs.
Pre-repair testing prevents wasted effort. Before disassembly, verify the damage actually requires screen replacement rather than software issues or loose connections. Test the new screen immediately after connecting cables but before applying adhesive. This critical step confirms functionality, allowing returns or exchanges if the part arrives defective. Discovering problems after permanent installation complicates warranty claims and wastes adhesive.
Post-repair testing ensures complete success:
- Check touch response across the entire screen surface
- Verify display brightness, colour accuracy, and viewing angles
- Test all buttons, sensors, and cameras for proper function
- Confirm wireless connectivity, speakers, and microphones work correctly
- Inspect screen edges for gaps or uneven seating
- Monitor for several hours to catch intermittent issues
Thorough testing identifies problems whilst you can still address them easily. Issues discovered weeks later become difficult to diagnose and fix.
Ensuring water resistance post-repair requires attention to adhesive application. Modern tablets use precisely cut adhesive strips that seal against moisture and dust. Position new adhesive exactly along frame edges, avoiding gaps or overlaps. Press the screen firmly around the entire perimeter, applying even pressure to activate the adhesive bond. Some repairers use clamps or weights for several hours to ensure complete adhesion. Proper sealing protects internal components and maintains device longevity.
Device longevity after repair depends on part quality and installation precision. Quality screens with proper installation last as long as originals, whilst budget parts may fail within months. Maintaining your repaired tablet involves using screen protectors, avoiding extreme temperatures, and handling with care. Following practical DIY phone screen repair guidance applicable to tablets extends device lifespan and maximises your repair investment.
Explore Buy2Fix tools and parts for confident tablet repairs
When you’re ready to tackle your tablet screen replacement, Buy2Fix provides everything UK repairers need for successful outcomes. Our extensive inventory includes OEM and high-grade replacement screens for popular tablet models, ensuring you find the exact part matching your device specifications. Specialised repair toolkits contain precision instruments designed for safe, effective disassembly and reassembly, eliminating guesswork about which tools you need. Beyond parts and tools, Buy2Fix offers detailed guides and responsive customer support tailored for UK technicians and DIY enthusiasts. Free UK mainland shipping, competitive pricing, and quality guarantees make sourcing trusted components convenient and cost-effective, helping you complete repairs confidently whilst maximising savings.
FAQ
Can I replace my tablet screen myself safely?
Yes, you can safely replace your tablet screen yourself by following correct procedures and using proper tools. Success depends on careful preparation, including backing up data, using ESD protection, and working methodically through each step. However, DIY repairs void manufacturer warranties and carry risks of further damage if rushed or done incorrectly. Small cracks on simpler tablet models suit DIY attempts, whilst complicated repairs involving battery damage or extensive adhesive warrant professional help. Understanding common mistakes to avoid significantly improves your success rate.
How much does it cost to replace a tablet screen in the UK?
Professional iPad screen repairs in the UK cost between £120 and £400 depending on model, whilst DIY approaches save up to 75%. Budget tablet models like the Samsung Galaxy Tab A cost £100-£140 professionally but only £25-£40 for DIY parts. Premium devices like the iPad Pro 11" reach £280-£350 for professional repair versus £80-£120 for quality replacement screens. Initial tool investment adds £20-£50, but these tools serve multiple repairs, making DIY increasingly cost-effective over time. The trade-off involves accepting warranty loss and assuming repair risks yourself.
What are common mistakes to avoid when replacing tablet screens?
Common mistakes include applying excessive force when prying screens, which cracks frames or shatters replacement parts before installation. Using metal tools near batteries or on adhesive areas risks punctures, short circuits, and scratches. Failing to disconnect flex cables carefully by releasing connector latches rather than pulling cables causes permanent damage. Neglecting to replace adhesive and clean residue thoroughly compromises water resistance and allows dust intrusion. Skipping pre-assembly screen testing wastes time if parts arrive defective, whilst forgetting data backups risks losing irreplaceable information. Taking time to avoid these common tablet repair mistakes dramatically improves repair outcomes.
How long does a DIY tablet screen replacement take?
First-time DIY tablet screen replacements typically require two to four hours, depending on model complexity and your experience level. Simple designs with minimal adhesive and accessible screws take less time, whilst tablets with extensive internal adhesive or complicated cable routing demand patience. Rushing increases mistake risk, so allocate adequate time without pressure. Experienced repairers complete familiar models in under an hour, but beginners should expect longer durations whilst learning proper techniques. Preparing your workspace, organising tools, and reviewing guides beforehand streamlines the process and reduces overall repair time.
Do I need special skills to replace a tablet screen?
Tablet screen replacement requires moderate technical aptitude, steady hands, and patience rather than specialised training. Basic understanding of electronic components, ability to follow detailed instructions, and comfort working with small parts prove essential. Experience with similar repairs helps but isn’t mandatory if you research thoroughly and work carefully. Critical skills include recognising when you’ve exceeded your capabilities and knowing when professional help becomes necessary. Starting with older, less valuable devices builds confidence before attempting expensive flagship tablets. Many successful DIY repairers began as complete beginners who invested time learning proper techniques and respecting the process.
Recommended
Let customers speak for us
For Samsung Galaxy A26 SM-A266B Original Earpiece Speaker with Cable

Very good communication throught. Good product

Well made part very strong easy to fit great value for the money

Well packed, with fast shipping :)

Exactly what the doctor ordered…great color, comfort, and durability. Trust this watch band!

Brilliant strap, second purchase, bought bracelet before. Excellent value. Thank you

Great item for splitting your Audio signal

Outstanding product!
Next level customer service.

Very satisfied but the delivery needs to get more faster...

Good price,quick delivery

Best phone case ever! This is my second one as I broke my first. Would defo recommend

Great fitting Apple Watch bands

For Apple Watch Ultra 3 / 2 / 1 49mm RedPepper Armor Metal Case Integrated Silicone Watch Band(Steel Black White)

Good price and quick postage

