

DIY laptop battery replacement: a beginner's guide
TL;DR:
- DIY laptop battery replacement involves safely removing the worn-out battery and installing a compatible new one to restore performance. Proper preparation, including the right tools and identifying the correct part number, is crucial to prevent damage and ensure a successful repair. Replacing the battery yourself can save money and extend your device’s lifespan if done carefully and following proper procedures.
DIY laptop battery replacement is the process of safely removing a worn-out battery from your laptop and installing a compatible new one to restore full battery life and performance. Most laptop batteries need replacing after 300 to 500 charge cycles, or when capacity drops below 60 to 70% of the original rating. Doing it yourself costs between £35 and £95 for parts, compared to £120 or more for a professional repair. This guide covers every stage: tools, battery identification, the physical swap, calibration, and troubleshooting. If you have basic technical confidence and a steady hand, you can complete the job in under two hours.
What tools do you need for DIY laptop battery replacement?
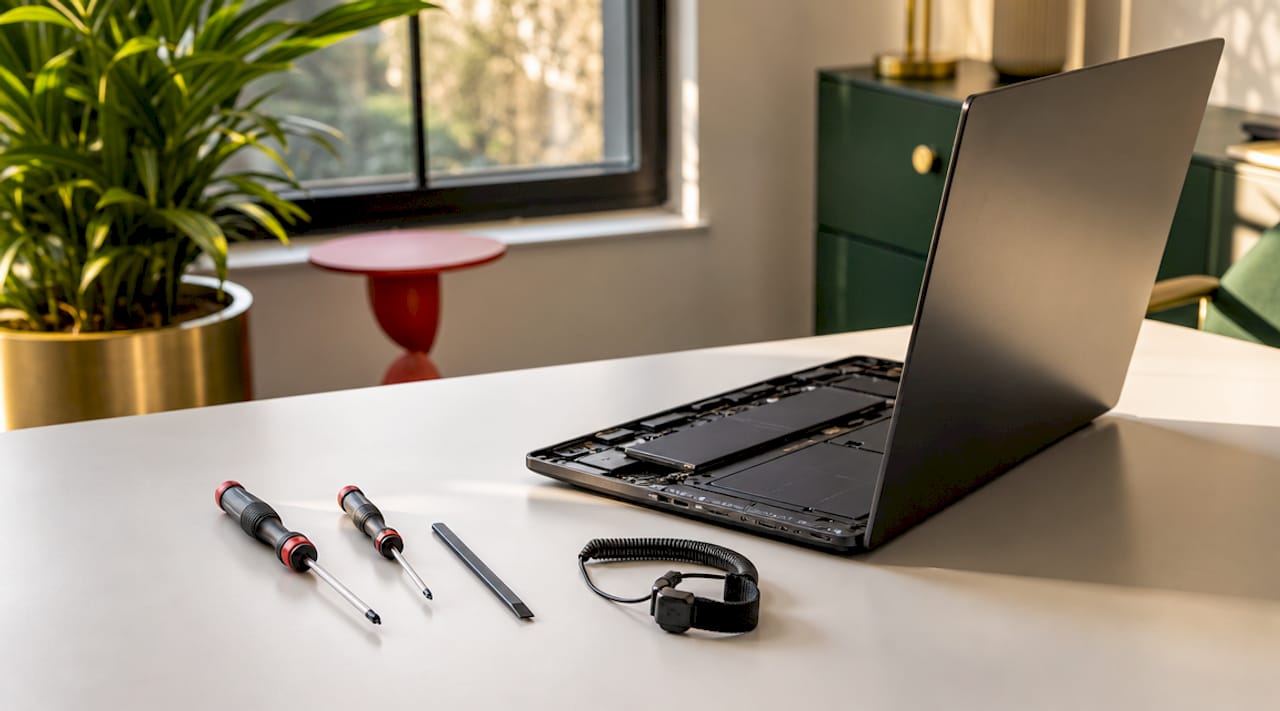
Getting your workspace and tools right before you open the chassis is the difference between a smooth job and a frustrating one. Rushing this stage is the most common beginner mistake.
The essential toolkit
You need four categories of tools for a safe battery swap. A set of Phillips screwdrivers in sizes PH0 and PH1 covers the vast majority of laptop chassis screws. Plastic spudgers are non-negotiable for prying panels without scratching or conducting electricity. An anti-static wrist strap grounds you and prevents electrostatic discharge from damaging sensitive components. A screw organiser, whether a magnetic mat or a set of labelled containers, keeps fasteners sorted during disassembly.
| Tool | Purpose |
|---|---|
| Phillips screwdriver (PH0, PH1) | Removing chassis and battery screws |
| Plastic spudger | Prying panels and disconnecting cables safely |
| Anti-static wrist strap | Preventing electrostatic discharge to motherboard |
| Screw organiser or magnetic mat | Keeping screws sorted by position for reassembly |
| Tweezers (plastic-tipped) | Handling small connectors and ribbon cables |
Work on a clean, hard, well-lit surface. Avoid carpeted floors or fabric-covered desks, as both generate static. Before you begin, shut down the laptop fully and unplug it from the mains. Then hold the power button for 15 seconds. Residual electricity in capacitors remains after shutdown, and this step discharges it to prevent shorts during the swap.
Consult your laptop’s official service manual before touching a single screw. Lenovo publishes detailed ThinkPad and IdeaPad service manuals online, and HP, Dell, and ASUS do the same. These documents show exact screw locations, cable routing, and any BIOS steps required before battery removal. You can also find guidance in our laptop DIY repair guide for additional preparation tips.
Pro Tip: Photograph the back panel and screw positions with your phone before removing anything. When you reassemble 45 minutes later, that photo is worth more than any written instruction.
How do you identify the correct replacement battery?
Buying the wrong battery is the single most expensive mistake in this process. The laptop model name alone is not enough to guarantee compatibility.
Every laptop battery carries a part number printed on its label, such as HSTNN-IB6N on HP units or L19M3PF0 on Lenovo models. This number is the only reliable identifier. You can also find it in the BIOS under battery information, or on the manufacturer’s support site by entering your laptop’s serial number. Using the exact part number rather than the general model name prevents thermal throttling, boot failures, and charge reporting errors.
OEM vs third-party batteries: what actually matters
OEM (original equipment manufacturer) batteries cost 25 to 40% more than third-party alternatives, but they communicate directly with the laptop’s firmware. Third-party batteries may lack this firmware-level communication, which leads to inaccurate charge percentage reporting and, in some cases, reduced usable lifespan. That said, reputable third-party suppliers who source quality cells can offer a practical middle ground for budget-conscious buyers.
Before purchasing any replacement, verify these five criteria:
- Voltage matches the original exactly (typically 10.8V, 11.1V, or 14.8V)
- Capacity in milliamp hours (mAh) is equal to or greater than the original
- Connector type and pin count match your existing battery cable
- Physical dimensions fit the battery bay without forcing
- Supplier reputation, including warranty terms and return policy
Pro Tip: Cross-reference the part number on at least two sources before buying. Manufacturers occasionally use multiple compatible part numbers for the same chassis, and a reputable supplier will list all of them.
For a useful comparison of DIY costs versus professional repair pricing, the iPhone battery replacement cost guide on the Buy2fix blog shows how the same cost logic applies across device types.
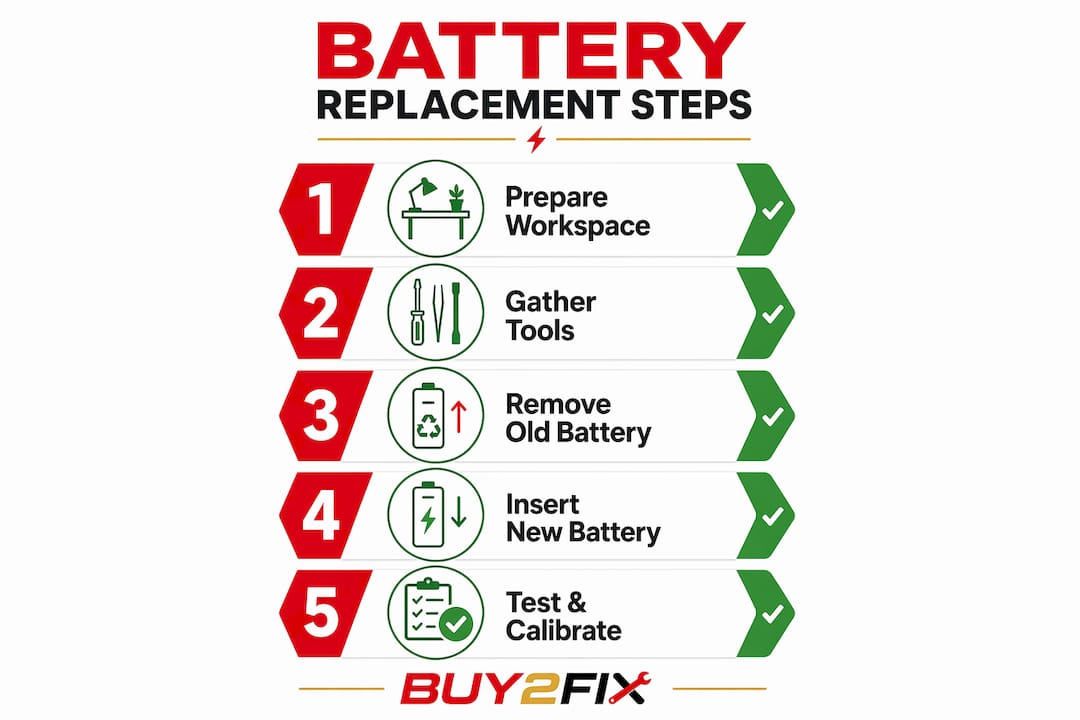
Step-by-step guide to replacing your laptop battery
The physical replacement follows a consistent sequence across most laptop models. Deviating from this order is where damage happens.
- Power down completely. Shut down via the operating system, not sleep or hibernate. Unplug the charger.
- Discharge residual power. Hold the power button for 15 seconds with the charger unplugged.
- Remove the back panel. Use the correct Phillips screwdriver for each screw. Place each screw in your organiser in the position it came from. Screw length varies within the same chassis, and mixing them up during reassembly can puncture the motherboard.
- Pry the panel gently. Work around the edges with a plastic spudger. Never force it. If resistance is strong, check for a hidden screw under a rubber foot or sticker.
- Locate the battery connector. It is a flat ribbon or multi-pin plug seated in a socket on the motherboard. Do not pull the cable itself. Use a plastic spudger or your fingernail to lift the connector straight up from its socket.
- Remove the battery. Most batteries are held by two to four screws. Some models, particularly thin ultrabooks from Dell XPS and Apple MacBook lines, use adhesive strips. For glued batteries, apply gentle warmth with a heat mat or a warm (not hot) cloth to soften the adhesive, then use a plastic card to slide underneath and release it gradually.
- Install the new battery. Place it in the bay, reconnect the cable firmly until it clicks or seats flush, and replace the screws in their original positions.
- Reassemble the panel. Press the panel down evenly before inserting screws. Tighten screws finger-tight first, then firm them up in a cross pattern to distribute pressure evenly.
- Calibrate the battery. Charge to 100%, leave plugged in for one hour, then discharge fully to near shutdown. Recharge to 100% without interruption. Battery calibration teaches the BIOS accurate capacity reporting and is necessary for a smooth user experience, though it does not repair battery health.
Safety warning: Never use metal tools to pry or lever any part of the battery or chassis. Metal tools risk puncturing lithium-ion cells, which can cause fire or irreparable motherboard damage. Always use plastic spudgers and plastic cards.
Safety warning: If you notice any swelling, bulging of the chassis, or a warped trackpad before you begin, stop immediately. Battery swelling indicates advanced cell failure and carries a genuine fire risk. Do not attempt DIY removal of a swollen battery. Take the device to a qualified technician.
Pro Tip: If the battery connector feels stiff, rock it gently from side to side rather than pulling straight up. Most connectors release with a slight rocking motion, not brute force.
How to troubleshoot common battery replacement problems
Even a careful job can produce unexpected results. Knowing what to look for saves time and prevents a second disassembly.
The most common issues after a battery swap, and how to address them:
- Battery not detected by the system. Power down, reopen the chassis, and reseat the battery connector. A connector that appears seated but is not fully clicked in will not register.
- Incorrect battery model installed. If the system reports an unrecognised battery or refuses to charge past a certain percentage, verify the part number against the original. Return and exchange if there is a mismatch.
- Charge percentage jumping erratically. This is usually a calibration issue. Complete a full discharge and recharge cycle as described in step 9 above. If it persists after two cycles, the battery may have firmware incompatibility.
- Laptop does not power on after reassembly. Check that no cables were dislodged during panel reinstallation. A disconnected CMOS battery or Wi-Fi antenna cable can prevent startup on some models.
- Screws that do not tighten properly. A screw that spins without gripping has been placed in the wrong hole or cross-threaded. Remove it, identify the correct position using your photograph, and reinsert carefully.
For additional guidance on recognising battery damage before and after a swap, the ASUS battery issues guide on the Buy2fix blog covers diagnostic signs in detail.
Old batteries must not go in general household waste. Lithium-ion cells are classified as hazardous. Most UK councils offer battery recycling at household waste centres, and many electronics retailers accept old batteries for safe disposal.
Key takeaways
A successful laptop battery swap depends on three things: the right part number, the right tools, and the right order of steps.
| Point | Details |
|---|---|
| Match the part number exactly | Use the battery label, BIOS, or manufacturer site to confirm the exact part number before purchasing. |
| Discharge residual power first | Hold the power button for 15 seconds after shutdown to prevent motherboard shorts during the swap. |
| Use plastic tools only | Metal pry tools risk puncturing lithium-ion cells and causing fire or hardware failure. |
| Organise screws during disassembly | Screw length varies within the same chassis; mixing them up can damage the motherboard on reassembly. |
| Calibrate after installation | A full discharge and recharge cycle teaches the BIOS accurate capacity reporting for the new battery. |
Why preparation matters more than the swap itself
I have seen more DIY battery jobs go wrong in the first five minutes than during the actual replacement. Someone skips the service manual, assumes all screws are the same length, and ends up with a cracked palm rest or a motherboard puncture from a misplaced fastener. The physical swap is genuinely straightforward on most laptops. The preparation is where the real skill lives.
The question I get asked most often is whether to buy OEM or third-party. My honest answer: if you are replacing a battery in a work machine you depend on daily, spend the extra on OEM. If it is a secondary device or an older laptop you are reviving on a budget, a quality third-party cell from a reputable supplier is a reasonable choice. What I would never do is buy the cheapest option from an unknown seller with no warranty. The cost saving is not worth the risk of a battery that reports 80% charge when it is actually at 20%.
The one scenario where I tell people to stop and call a professional is a swollen battery. No amount of preparation makes that safe to handle at home. The fire risk from a compromised lithium-ion cell is real, and it is not a situation where patience and the right screwdriver will see you through.
For most people with basic technical confidence, though, this is a genuinely satisfying repair. You extend the life of a device, save money, and come away knowing your laptop better than you did before.
— Adewale
Get the right parts from Buy2fix
Buy2fix stocks replacement laptop batteries, plastic spudger sets, screwdriver kits, and anti-static accessories for a wide range of laptop brands, including Lenovo, HP, Dell, ASUS, and Acer. All parts go through quality checks before dispatch, and orders to UK mainland addresses ship free. The 30-day return policy means you are covered if a part does not match your device. Whether you need a single replacement cell or a full laptop repair toolkit, Buy2fix has the parts and the guidance to get your device running again without an expensive workshop visit.
FAQ
How long does a laptop battery replacement take?
Most DIY laptop battery replacements take between 30 and 120 minutes depending on the model and whether adhesive is involved. Ultrabooks with glued batteries take longer than standard screw-mounted designs.
Can I replace a swollen laptop battery myself?
No. Swollen batteries indicate advanced cell failure and carry a fire risk that makes DIY removal unsafe. Take the device to a qualified repair technician immediately.
How do I find my laptop battery part number?
Check the label on the existing battery, look under battery information in the BIOS, or enter your laptop’s serial number on the manufacturer’s support site. The part number is the only reliable identifier for compatibility.
Do I need to calibrate a new laptop battery?
Yes. Charging to 100%, then fully discharging, then recharging to 100% without interruption teaches the BIOS accurate capacity reporting for the new cell. It does not improve battery health but prevents erratic charge percentage readings.
Is a third-party battery safe to use?
A third-party battery from a reputable supplier with a warranty is generally safe. Be aware that some third-party cells lack firmware communication, which can cause inaccurate charge reporting. Always verify voltage, capacity, and connector compatibility before purchasing.
Recommended
Let customers speak for us
Well made part very strong easy to fit great value for the money

Well packed, with fast shipping :)

Exactly what the doctor ordered…great color, comfort, and durability. Trust this watch band!

Brilliant strap, second purchase, bought bracelet before. Excellent value. Thank you

Great item for splitting your Audio signal

Outstanding product!
Next level customer service.

Very satisfied but the delivery needs to get more faster...

Good price,quick delivery

Best phone case ever! This is my second one as I broke my first. Would defo recommend

Great fitting Apple Watch bands

For Apple Watch Ultra 3 / 2 / 1 49mm RedPepper Armor Metal Case Integrated Silicone Watch Band(Steel Black White)

Good price and quick postage

Perfect fit.

Absolutely necessary

Second Purchase and still a very happy customer. Keep up the good work.
