

Laptop screen replacement steps: your DIY guide
TL;DR:
- Replacing your cracked or flickering laptop screen can be done in under an hour by following proper DIY steps, saving time and money.
- Precise matching of the LCD panel’s part number and careful handling of cables ensure compatibility and successful installation.
Your laptop screen is cracked, flickering, or showing lines of dead pixels. Taking it to a repair shop means handing it over for up to a week and paying a premium for the privilege. The good news is that following the right laptop screen replacement steps can get your machine looking perfect again in under an hour, at a fraction of the cost. This guide covers everything: the right tools, how to order the correct part, a clear step-by-step removal and installation process, and how to troubleshoot the issues that catch most first-timers out.
Table of Contents
- Key takeaways
- Laptop screen replacement steps: tools and preparation
- Removing the damaged screen safely
- Installing the new screen and reassembling
- Troubleshooting common screen replacement problems
- My honest take on DIY screen replacement
- Get the right parts from Buy2fix
- FAQ
Key takeaways
| Point | Details |
|---|---|
| Match the panel part number | Use the exact LCD panel number, not just the laptop model, to avoid compatibility failures. |
| Gather tools before you start | You need a Phillips #00 screwdriver, plastic pry tools, and an anti-static wrist strap at minimum. |
| Always do a dry test | Power on the laptop with the new screen connected but the bezel off before closing everything up. |
| Use plastic tools on bezels | Modern thin bezels crack easily under metal tools or excessive force. |
| DIY saves serious time | A first-time replacement takes 30 to 60 minutes, while a professional repair can take 3 to 7 business days. |
Laptop screen replacement steps: tools and preparation
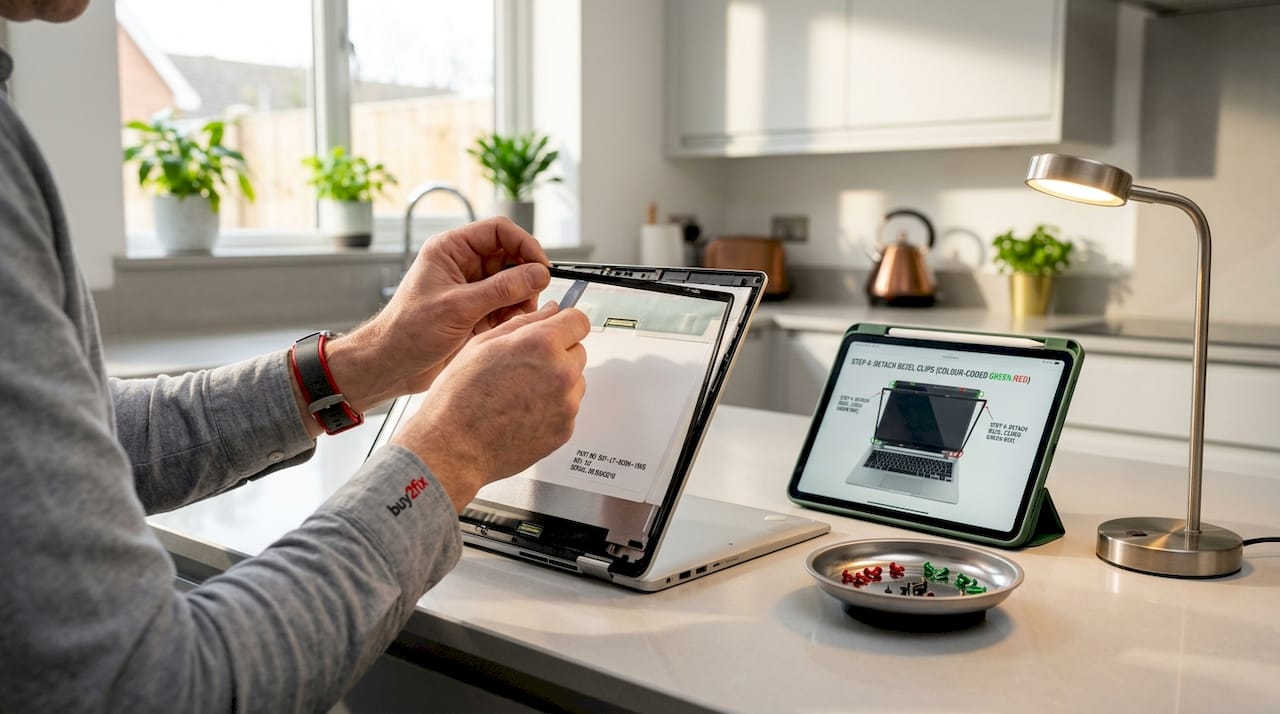
Getting the preparation right is what separates a smooth repair from a frustrating one. Before you touch a single screw, you need the right tools, the correct replacement panel, and a workspace that will not cause further damage.
The tools you actually need
According to the tools required for safe repair, you will need the following for a safe and effective repair:
- Phillips #00 or #000 screwdriver for the small bezel and mounting bracket screws
- Plastic pry tool or spudger to separate the bezel without gouging the plastic
- Anti-static wrist strap to prevent electrostatic discharge from damaging sensitive components
- Tweezers for handling adhesive pull-tabs on ribbon cables
- Suction cup (optional but useful) for lifting thin, adhesive-secured screens on slimline laptops
Do not substitute metal tools for plastic ones here. Thin bezels on modern laptops are frequently secured with adhesive as well as clips, and metal will crack or scratch them permanently.
Ordering the right replacement screen
This is where most DIY repairs go wrong before they even begin. Your laptop model number is not enough. The same laptop line can ship with two or three different LCD panels from different manufacturers. Exact panel matching is critical because relying on the model number alone leads to incompatibility in up to 20% of cases.
The only reliable method is to open the laptop lid slightly, remove the bezel (covered in the next section), and read the part number printed directly on the back of the current screen. That string of characters is what you search for when ordering your replacement. Write it down before you disassemble anything.
| Specification to check | Why it matters |
|---|---|
| Panel part number | Confirms physical fit and connector type |
| Resolution | Must match exactly to avoid display errors |
| Connector type (eDP or LVDS) | Wrong connector means no image at all |
| Backlight type (LED) | Affects brightness and power compatibility |
Pro Tip: Take a photo of the part number on the back of the old screen before you remove it. You will have the reference saved even if you forget to write it down.
Setting up your workspace
Work on a clean, flat surface in good light. A folded towel or anti-static mat underneath the laptop protects both the machine and your work surface. Switch off the laptop fully, unplug the power cable, and remove the battery if it is accessible from the underside. These steps are not optional. They protect both you and the components inside.
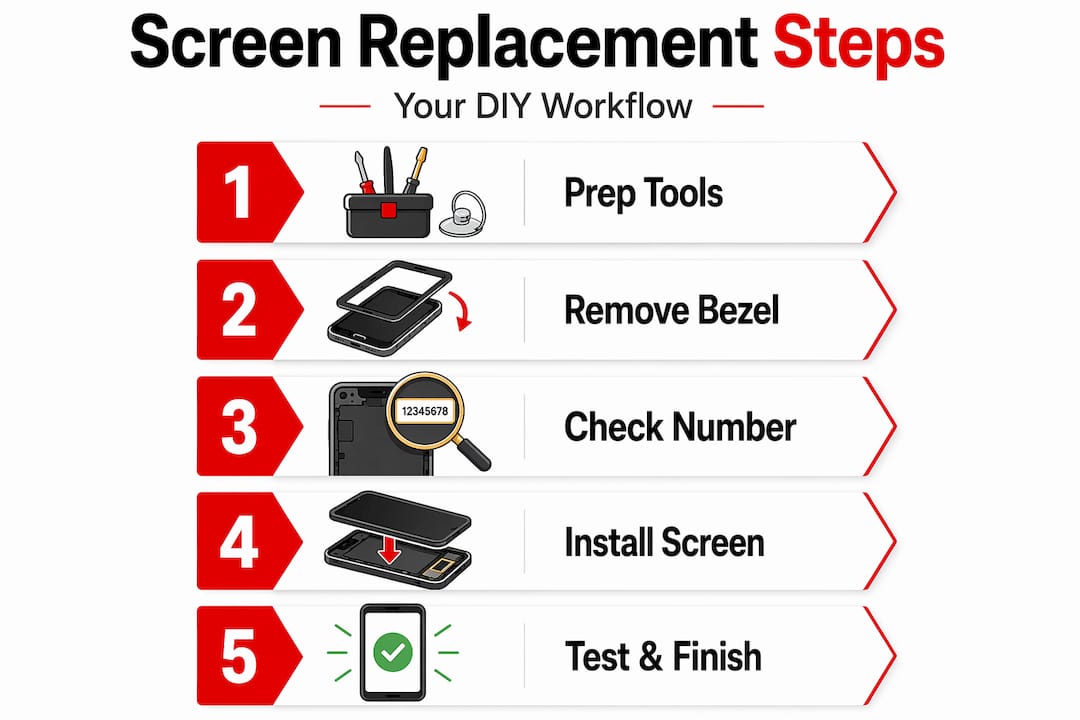
Removing the damaged screen safely
With your tools assembled and your replacement part on the way, here is the step-by-step process for taking out the broken screen. Work slowly. The components inside a laptop lid are thin, light, and far less forgiving than a desktop.
-
Power down completely. Shut the laptop down from the operating system, then hold the power button for five seconds to discharge any residual power. Unplug the charger and remove the battery.
-
Locate the screw covers on the bezel. Most laptop screens have rubber plugs or sticker covers hiding the screws around the border of the screen. Use tweezers or a fingernail to lift these off gently. Set them aside in a small container so they do not get lost.
-
Remove the bezel screws. Use the appropriate Phillips screwdriver and loosen each screw in a consistent pattern. Count them as you go, and keep them organised by location if they vary in length.
-
Pry the bezel away from the lid. Starting at a corner, slide the plastic pry tool into the gap between the bezel and the lid shell. Work your way around the edge with gentle, even pressure. You will hear clicks as the retaining clips release. Using plastic tools here is non-negotiable. Metal pry tools will crack the bezel.
-
Remove the mounting bracket screws. Once the bezel is off, you will see the screen held in place by metal brackets on either side. Unscrew these and keep them safe.
-
Tilt the screen forward carefully. Lift the panel slightly and angle it toward the keyboard so the back of the screen faces you. Support it gently, as it is still connected by a cable.
-
Disconnect the video cable. Lift the adhesive tape securing the cable first, then use the pull-tab or a pair of tweezers to ease the connector out. Never pull the cable by the wire itself. Grip only the plastic connector housing. Improper cable handling is one of the most common causes of DIY repair failure, so take your time here.
Pro Tip: Before disconnecting the video cable, take a photo of how it is routed and secured. You will reference this when routing the new cable during reassembly.
Installing the new screen and reassembling
With the old screen out, the installation is essentially the removal process in reverse. The details, however, matter enormously.
-
Unbox your replacement screen carefully and place it face-down on your folded towel. Check the connector type and confirm it matches the cable from your laptop before going any further.
-
Connect the video cable to the new panel. Align the connector with the port on the back of the screen and press firmly and evenly until it clicks or seats fully. A partially connected cable will give you a blank screen or a flickering image.
-
Route the cable correctly. Follow the routing path you photographed during disassembly. The cable must not be pinched between the screen and the bracket, and it should not be pulled taut when the lid is opened and closed.
-
Perform a dry test. This is the step most first-timers skip, and skipping it is a mistake. Before you screw anything back in, power on the laptop with the new screen connected and check the display. Look for an even image, correct colours, and no lines or flickering. If something is wrong, you want to find out now, not after you have snapped the bezel shut.
-
Secure the mounting brackets. Once you are satisfied the screen works, power off the laptop again, reattach the metal brackets on both sides, and tighten the screws. Do not overtighten them; these are small threads in thin metal and they strip easily.
-
Snap the bezel back on. Align the bezel around the screen and press it into place starting from the corners. Work your way around, applying firm pressure until each clip seats. You should hear a series of clicks.
-
Replace the screws and covers. Return each screw to its original position and press the rubber covers or stickers back over them.
Pro Tip: If your laptop uses adhesive to secure the screen to the bezel, apply fresh adhesive strips before reassembly rather than relying on the old tape, which will have lost most of its grip.
Troubleshooting common screen replacement problems
Even with careful work, you may run into issues. Here is what to look for and how to address it.
-
Blank screen after installation. Power off the laptop, reopen the bezel, and reseat the video cable connector. A blank display almost always means the cable is not fully connected. Check both ends if possible.
-
Flickering, lines, or colour distortions. These symptoms suggest either a loose cable or a faulty replacement panel. Connecting an external monitor via HDMI will help you diagnose which one it is. If the external display looks normal, the issue is the screen or its cable connection. If the external display also shows problems, the graphics hardware inside the laptop may be the cause.
-
Bezel does not sit flat or gaps remain. Check for any clips that did not seat properly and press along the edge again. Sometimes a hidden screw has been missed. Compare the bezel position with photos from before disassembly.
-
Screen image looks correct but resolution is wrong. This usually means the replacement panel has a different resolution from the original. Double-check the part number you ordered against the number on the old panel.
A mismatched part number is far more common than people realise. Ordering by laptop model alone leads to connection or fit issues in a meaningful number of cases. Always verify from the panel itself.
For a broader look at how these principles apply across devices, the screen replacement best practices guide from Buy2fix covers lasting repair techniques worth reading alongside this tutorial.
My honest take on DIY screen replacement
I have worked through enough screen replacements to know that the anxiety before you start is almost always worse than the repair itself. The first time I cracked open a laptop lid, I was convinced I would snap something irreplaceable within the first two minutes. What I actually found was that the process is methodical and manageable, provided you do not rush.
The single biggest mistake I see people make is ordering the part by laptop model number rather than verifying the exact panel part number from the screen itself. I have seen this cause real problems: connectors that do not fit, panels that are the right physical size but the wrong resolution, and screens that are returned and reordered at the cost of another week’s wait. Verify the panel number first, every time. It takes five minutes and saves enormous frustration.
The other lesson I would pass on is that patience with the video cable pays off more than almost anything else. That connector is smaller than you expect, and the temptation to pull by the wire rather than the housing is real, especially when you are working in a tight space. Slow down at that moment specifically.
If you go into this repair with your tools ready, your part confirmed, and a photo of your cable routing saved on your phone, you will find it far less daunting than it looks on paper. A first-time screen replacement takes most people between 30 and 60 minutes. That is a genuinely satisfying way to spend an hour.
— Adewale
Get the right parts from Buy2fix
If you are ready to carry out your repair, Buy2fix stocks a broad range of laptop replacement screens, precision screwdrivers, plastic pry tools, and anti-static wrist straps, all shipped free to UK mainland addresses. The inventory covers components for major brands and a wide range of laptop models, with quality checks carried out before dispatch. You will also benefit from a 30-day return policy and warranty support on eligible items, which means you are not taking a risk when you order. Browse the full range of laptop repair parts at Buy2fix, and check the tablet screen replacement guide if you have other devices that need attention. Sourcing from a trusted UK supplier removes the guesswork about compatibility and delivery times, so you can get your repair done with confidence.
FAQ
How long does a DIY laptop screen replacement take?
For a first-timer, the process typically takes 30 to 60 minutes. Having your tools organised and your workspace ready beforehand keeps the repair at the lower end of that estimate.
How do I find the right replacement screen for my laptop?
Remove the bezel and read the part number printed on the back of the existing screen. Using only the model number is unreliable and leads to incompatible parts in a significant number of cases.
What tools do I need for a laptop screen replacement?
You need a Phillips #00 or #000 screwdriver, a plastic pry tool or spudger, an anti-static wrist strap, and tweezers. A suction cup is useful for slimline laptops with adhesive-secured panels.
Why is there no image after I installed the new screen?
A blank display almost always means the video cable connector is not fully seated. Power off, reopen the lid, and press the connector firmly into place. Use an external monitor to rule out a graphics hardware issue if the problem persists.
Is it worth repairing a laptop screen myself?
Yes, in most cases. Professional repairs for premium laptops can cost several hundred pounds, and turnaround times run from three to seven business days. A DIY repair costs the price of the panel and takes less than an hour.
Recommended
Let customers speak for us
Well made part very strong easy to fit great value for the money

Well packed, with fast shipping :)

Exactly what the doctor ordered…great color, comfort, and durability. Trust this watch band!

Brilliant strap, second purchase, bought bracelet before. Excellent value. Thank you

Great item for splitting your Audio signal

Outstanding product!
Next level customer service.

Very satisfied but the delivery needs to get more faster...

Good price,quick delivery

Best phone case ever! This is my second one as I broke my first. Would defo recommend

Great fitting Apple Watch bands

For Apple Watch Ultra 3 / 2 / 1 49mm RedPepper Armor Metal Case Integrated Silicone Watch Band(Steel Black White)

Good price and quick postage

Perfect fit.

Absolutely necessary

Second Purchase and still a very happy customer. Keep up the good work.
