

Fix iPhone 13 Pro Max screen: step-by-step DIY guide
Cracked iPhone 13 Pro Max screens typically cost £200 to £300 for full replacements, but glass-only repairs slash that expense to just £4 to £5 in parts. This dramatic saving comes with a trade-off: you need patience, precision, and the right equipment to separate delicate OLED panels from shattered glass without causing permanent damage. This comprehensive guide walks you through every stage of the glass-only replacement process, from gathering specialist tools to testing your restored screen, helping DIY enthusiasts and small repair businesses master this cost-effective repair technique.
Table of Contents
- Tools And Materials Needed For Glass-Only Screen Repair
- Step-By-Step Guide To Replacing The Glass On An IPhone 13 Pro Max
- Testing, Troubleshooting, And Common Mistakes To Avoid
- Find Quality IPhone 13 Pro Max Replacement Parts At Buy2Fix
- FAQ
Key takeaways
| Point | Details |
|---|---|
| Cost savings | Glass-only repair reduces expenses from £200-£300 to £4-£5 in parts |
| Essential equipment | Refox refurbishing machines, heat guns, and adhesive removal chemicals are critical |
| OLED fragility | The display panel requires immediate testing after glass separation to detect damage |
| Skill requirement | This repair demands patience and precision but delivers substantial financial benefits |
Tools and materials needed for glass-only screen repair
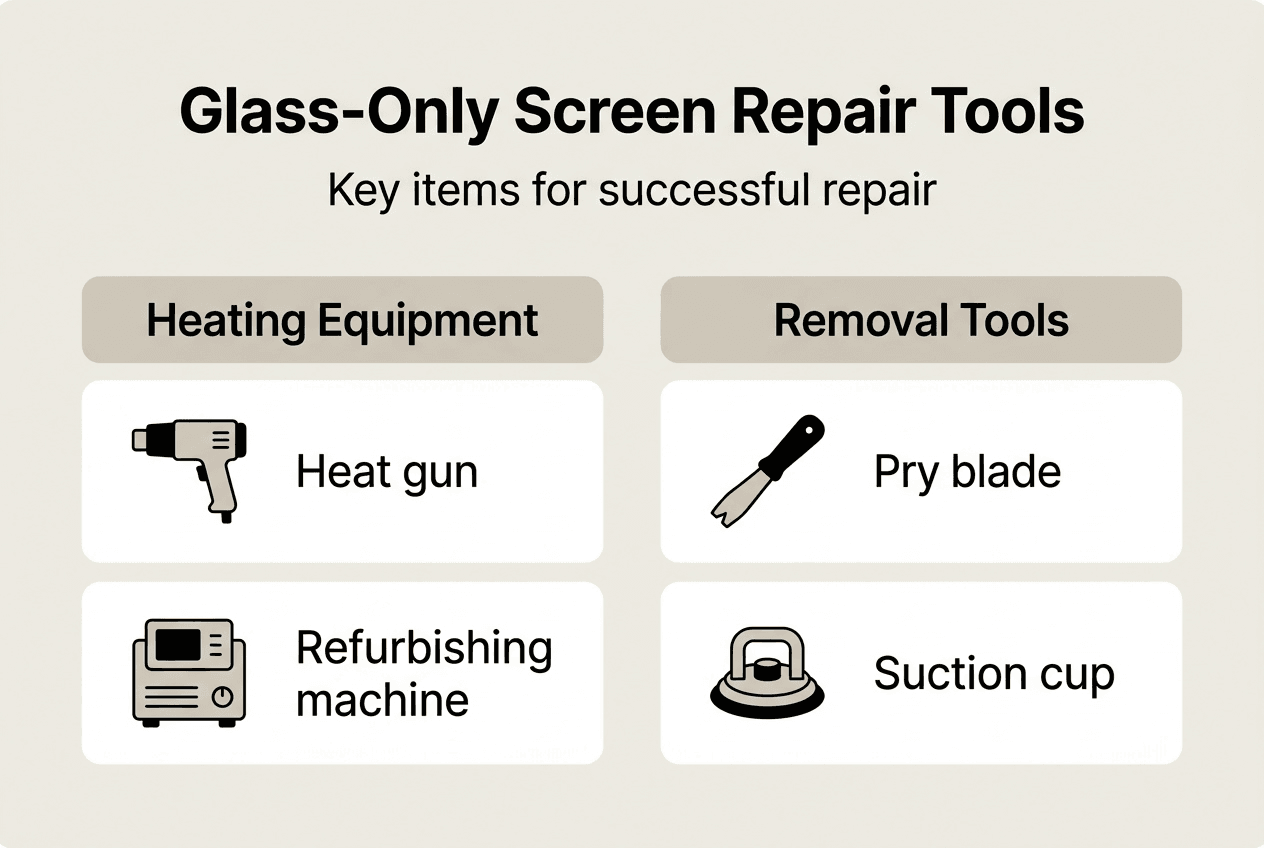
Successful glass-only screen repair begins with proper preparation. You’ll need a heat gun to soften adhesive layers, a Refox refurbishing machine for glass separation and lamination, precision screwdrivers for disassembly, and suction cups for safe screen removal. Chemical adhesive removers dissolve stubborn bonding agents without damaging the OLED panel, whilst microfibre cloths prevent scratches during cleaning.
Your materials list should include replacement glass specifically designed for iPhone 13 Pro Max dimensions, optical clear adhesive for lamination, isopropyl alcohol for surface preparation, and lint-free wipes. The Refox machine serves dual purposes: it applies controlled heat and vacuum pressure to separate cracked glass from the OLED, then laminates fresh glass with precision alignment. Small repair businesses often find this investment worthwhile given the volume of screen repairs they handle.
Pro Tip: Create a dedicated workspace with anti-static mats and bright overhead lighting. Dust particles trapped under new glass create visible defects that compromise professional results, so consider working in a clean room environment or using air purifiers to minimise airborne contaminants.
Here’s a complete equipment checklist organised by function:
| Tool Category | Specific Items | Primary Function |
|---|---|---|
| Heating Equipment | Heat gun, Refox refurbishing machine | Softens adhesive, enables glass separation |
| Disassembly Tools | Pentalobe screwdrivers, tri-point drivers, suction cups | Safe screen removal and access |
| Cleaning Supplies | Isopropyl alcohol, microfibre cloths, lint-free wipes | Surface preparation and debris removal |
| Lamination Materials | OCA adhesive, replacement glass, alignment jigs | Bonds new glass to OLED panel |
Quality tools directly influence repair outcomes. Cheap heat guns produce inconsistent temperatures that risk OLED damage, whilst inferior adhesives fail within weeks. If you’re tackling multiple repairs, investing in professional-grade equipment pays dividends through reduced failure rates and faster turnaround times. For guidance on related repairs, explore our iPhone 12 Pro Max back screen replacement guide for complementary techniques.
Step-by-step guide to replacing the glass on an iPhone 13 Pro Max
With your workspace prepared and tools assembled, you’re ready to begin the intricate glass replacement process. Each step builds on the previous one, so rushing through early stages creates complications later. This methodical approach minimises risks whilst maximising success rates.
-
Power down and disassemble the device: Remove the two pentalobe screws flanking the charging port, then use a suction cup near the bottom edge to create a small gap. Insert a plastic opening tool to release the adhesive seal around the screen perimeter, working carefully to avoid damaging internal flex cables. Once freed, lift the screen at a 90-degree angle and disconnect the battery, display, and digitiser connectors using a spudger.
-
Separate cracked glass from OLED panel: Position the screen assembly in your Refox machine for glass separation, applying gentle heat to soften the adhesive layer. The machine’s vacuum system lifts the cracked glass whilst protecting the fragile OLED beneath. This stage demands patience, as forcing separation causes irreversible display damage. Work slowly, allowing heat to penetrate thoroughly before applying lifting pressure.
-
Clean the OLED surface meticulously: Use adhesive remover chemicals to dissolve residual bonding agents, then wipe the surface with isopropyl alcohol-soaked lint-free cloths. Any remaining adhesive creates air bubbles under the new glass, whilst fingerprints or oils prevent proper bonding. Inspect the OLED under bright light, ensuring complete cleanliness before proceeding.
-
Laminate replacement glass using precision alignment: Apply optical clear adhesive to the cleaned OLED, then carefully position the new glass using alignment jigs to ensure perfect placement. Load the assembly into the Refox machine’s lamination chamber, which uses vacuum pressure and controlled heat to bond the layers without air pockets. This process typically takes 10 to 15 minutes, depending on your machine’s specifications.
-
Reassemble and conduct functionality tests: Reconnect the display and digitiser flex cables, then temporarily power on the device before full reassembly. Test touch responsiveness across all screen zones, verify colour accuracy and brightness levels, and check for dead pixels or display anomalies. Only after confirming full functionality should you reconnect the battery permanently and seal the device.
Pro Tip: Keep the OLED panel face-up throughout the repair process to prevent accidental pressure damage. Even minor flexing can create internal cracks invisible to the naked eye but catastrophic for display function. For additional screen repair insights, review our iPhone 12 Max screen replacement guide covering similar techniques.
| Repair Stage | Time Required | Critical Success Factor |
|---|---|---|
| Disassembly | 15-20 minutes | Careful connector handling |
| Glass separation | 20-30 minutes | Controlled heat application |
| OLED cleaning | 10-15 minutes | Complete adhesive removal |
| Lamination | 10-15 minutes | Precise glass alignment |
| Testing and reassembly | 15-20 minutes | Thorough functionality verification |
Testing, troubleshooting, and common mistakes to avoid
Immediate testing after glass separation reveals OLED damage before you invest time in lamination. Connect the display to the device’s logic board and power on, observing for uniform backlighting, accurate colour reproduction, and responsive touch input. Testing the OLED panel immediately after glass removal detects fractures or pressure damage that occurred during separation, allowing you to source a replacement OLED before wasting materials on a doomed repair.
Common problems plague even experienced technicians. Adhesive failure stems from inadequate surface cleaning or rushing the lamination process before the OLED reaches optimal temperature. Dust contamination occurs when working in uncontrolled environments, creating visible particles trapped between glass and display. OLED damage manifests as dead zones, discolouration, or complete display failure, usually resulting from excessive heat or mechanical pressure during separation. Touch sensitivity issues indicate damaged digitiser layers or improperly seated flex cable connections.
Troubleshooting requires systematic diagnosis. If touch responsiveness fails in specific zones, reseat the digitiser connector and verify the flex cable hasn’t torn during disassembly. Colour banding or backlight bleeding suggests OLED damage requiring full screen replacement rather than glass-only repair. Air bubbles under glass indicate contamination or insufficient vacuum pressure during lamination, necessitating glass removal and re-cleaning before attempting a second bond.
Glass-only replacement demands skill and patience that separates successful repairs from expensive failures. Rushing through critical stages or skipping verification steps transforms cost-effective repairs into costly mistakes requiring professional intervention.
Preventative measures drastically improve success rates. Always test OLED functionality before laminating new glass, as discovering damage afterwards wastes materials and time. Maintain consistent heat application during glass separation, avoiding hot spots that warp delicate display components. Use alignment jigs rather than eyeballing glass placement, as even millimetre-scale misalignment creates touch calibration issues. Document each repair stage with photos, helping you identify where problems occurred if you need to repeat the process.
Mistakes to avoid include applying excessive force during glass separation, which fractures the OLED beneath. Skipping the cleaning stage leaves residue that prevents proper adhesion, causing premature glass detachment. Using incompatible adhesives creates bonding failures or chemical reactions that damage display layers. Neglecting to disconnect the battery before beginning work risks short circuits that destroy logic board components. For comprehensive iPhone screen repair principles, consult our replace iPhone screen DIY guide covering fundamental techniques.
Experienced repair technicians emphasise that patience delivers better outcomes than speed. Taking an extra five minutes to ensure thorough cleaning prevents hours of rework. Testing at each critical stage catches problems early when solutions remain simple and inexpensive. Building experience through practice on damaged screens before attempting customer repairs protects your reputation whilst developing essential skills.
Find quality iPhone 13 Pro Max replacement parts at buy2fix
Successful glass-only repairs depend on sourcing reliable replacement components that match original specifications. Buy2fix serves UK repair professionals and DIY enthusiasts with comprehensive iPhone 13 Pro Max parts, from precision-cut replacement glass to OEM-grade adhesives and essential repair tools. Our quality assurance process ensures every component meets strict performance standards, whilst our technical support team helps you select exactly the right parts for your specific repair needs. Free UK mainland shipping and competitive pricing make professional-quality repairs accessible whether you’re fixing a single device or running a small repair business. Explore our complete range of replacement parts and tools to equip your workshop with everything needed for successful screen repairs.
FAQ
How can I tell if I need a full screen replacement or just glass replacement?
Full screen replacement becomes necessary when you observe touch responsiveness failures, visible lines across the display, or colour discolouration that indicates OLED damage. Glass-only replacement works perfectly when cracks affect only the top protective layer whilst the underlying display shows no functional impairment. Test touch sensitivity and display quality before committing to either repair approach.
Is replacing just the glass on an iPhone 13 Pro Max worth the time and effort?
The financial savings justify the effort for repair businesses and skilled DIY enthusiasts comfortable with delicate procedures. Glass-only replacement requires significant skill and patience, making it less suitable for first-time repairers or those seeking quick fixes. Small repair shops benefit from the profit margins this technique enables, whilst hobbyists gain valuable experience and dramatic cost savings.
What precautions should I take to avoid damaging the OLED panel during repair?
Handle the OLED with extreme gentleness, avoiding any bending or pressure that could fracture internal layers. Testing the panel immediately after glass separation detects damage early, preventing wasted time on subsequent repair stages. Always support the entire panel surface when moving it, never holding by edges or corners that concentrate stress on fragile components.
How long does a properly executed glass-only repair typically last?
Professional-quality glass-only repairs using premium adhesives and proper lamination techniques match the durability of original factory screens. The longevity depends primarily on installation quality rather than the repair method itself. Proper surface preparation, contamination-free lamination, and thorough curing ensure bonds that withstand normal use for years.
Can I perform glass-only replacement without a Refox refurbishing machine?
Whilst alternative methods exist using manual heat application and separation tools, professional refurbishing machines dramatically improve success rates and reduce OLED damage risks. The controlled heat distribution and vacuum-assisted separation these machines provide justify their cost for anyone performing multiple repairs. Single repairs might succeed with careful manual techniques, but the risk of expensive OLED damage increases substantially.
What should I do if I discover OLED damage after completing the glass replacement?
Unfortunately, OLED damage requires full screen assembly replacement, as individual OLED panels aren’t available separately for this model. This highlights the critical importance of testing display functionality immediately after glass separation, before investing time and materials in lamination. Document the damage with photos and consider whether the repair remains cost-effective compared to sourcing a complete replacement screen assembly.
Recommended
Let customers speak for us
Well made part very strong easy to fit great value for the money

Well packed, with fast shipping :)

Exactly what the doctor ordered…great color, comfort, and durability. Trust this watch band!

Brilliant strap, second purchase, bought bracelet before. Excellent value. Thank you

Great item for splitting your Audio signal

Outstanding product!
Next level customer service.

Very satisfied but the delivery needs to get more faster...

Good price,quick delivery

Best phone case ever! This is my second one as I broke my first. Would defo recommend

Great fitting Apple Watch bands

For Apple Watch Ultra 3 / 2 / 1 49mm RedPepper Armor Metal Case Integrated Silicone Watch Band(Steel Black White)

Good price and quick postage

Perfect fit.

Absolutely necessary

Second Purchase and still a very happy customer. Keep up the good work.
