

Understanding LCD screens: key facts and repair essentials
TL;DR:
- LCDs are complex layered panels using liquid crystals and backlit illumination to display images.
- Most repairs require full assembly replacements due to fused layers and specialized construction.
- Choosing the correct LCD involves matching the original panel type, device model, and quality considerations.
Most people assume a broken phone screen is just a cracked piece of glass. In reality, that slim panel contains multiple layers of sophisticated technology working together to produce every pixel you see. At the heart of most mobile displays sits an LCD, and understanding what it actually does changes how you approach every repair job. Whether you are a DIY enthusiast tackling your first screen swap or running a small repair business, this guide covers LCD fundamentals, how these screens function inside devices, the realities of replacement, and how to select the right part for any job.
Table of Contents
- What is an LCD? Understanding the basics
- How LCD screens work in mobile devices
- Changing an LCD: key steps and common pitfalls
- LCD types and how to choose the right one for repairs
- The reality of LCD repairs: what most people miss
- Get expert support for your next LCD repair
- Frequently asked questions
Key Takeaways
| Point | Details |
|---|---|
| LCDs explained simply | LCDs use liquid crystals and a backlight to create images on mobile screens. |
| Repairs require full assemblies | Mobile LCD repairs are safest and most effective when you replace the entire glass, LCD, and digitiser unit. |
| Choosing the right LCD matters | Matching the correct LCD type and ensuring compatibility with your device ensures repair success. |
| DIY needs genuine parts | For reliable repairs, always source authentic LCD assemblies rather than risk glass-only fixes. |
What is an LCD? Understanding the basics
LCD stands for Liquid Crystal Display. It is a flat-panel display technology that uses liquid crystals to control how light passes through a screen to produce images. As explained in the how LCDs work reference, an LCD is a flat-panel technology using liquid crystals to modulate light from a backlight for images in mobile devices. The term “liquid crystal” might sound contradictory, but these are materials that flow like a liquid while maintaining the organised molecular structure normally found in solid crystals.
LCDs rely on a backlight, usually an LED array, that shines continuously behind the panel. The liquid crystals then act as a gate, aligning in different directions when an electrical charge is applied. This alignment either blocks or permits light to pass through, creating the contrast between bright and dark areas that forms each pixel. Without that precise molecular dance, the image simply would not exist.
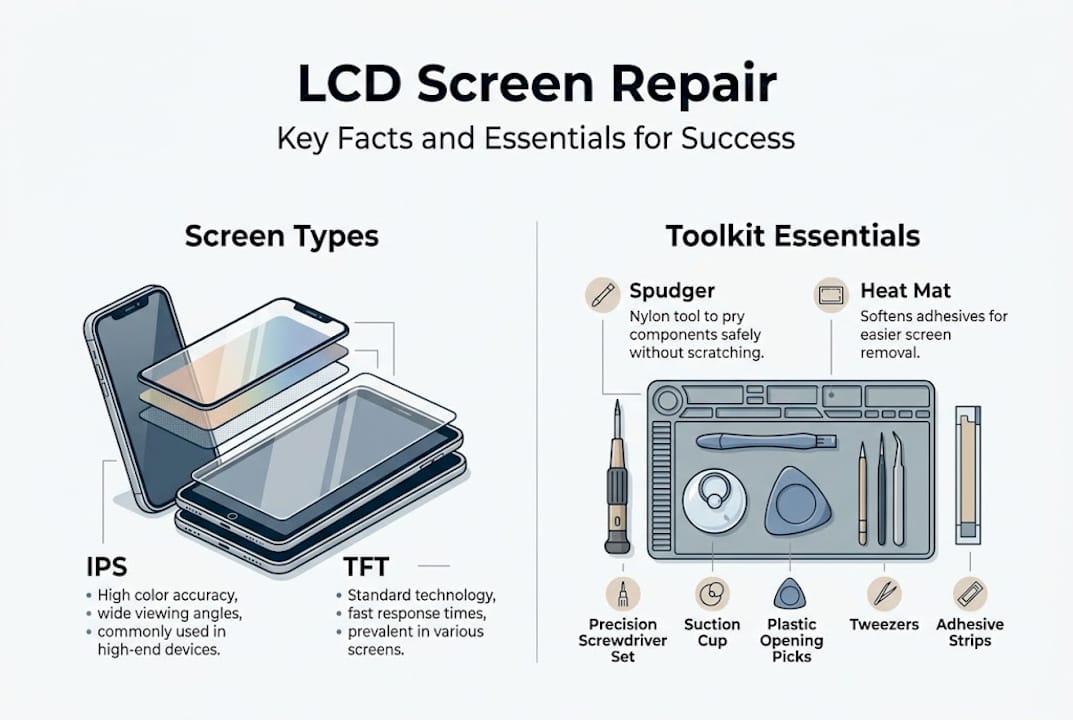
For anyone exploring DIY LCD basics, it helps to know the two most common liquid crystal types used in mobile technology:
- Nematic liquid crystals: The most widely used type. They align in a single direction when voltage is applied, making them responsive and cost-effective for mass production.
- Smectic liquid crystals: Arranged in layers, offering greater stability but slower response times. Less common in smartphones but found in some specialist displays.
The table below summarises why LCDs remain the dominant choice for mobile devices:
| Factor | LCD advantage |
|---|---|
| Power efficiency | Backlight can be dimmed to save battery |
| Flat-panel format | Fits slim modern device frames |
| Production cost | Cheaper to manufacture than OLED |
| Brightness | Consistently high in daylight |
| Repairability | Assembly replacement is well-established |
LCDs account for the vast majority of screens across mid-range and budget smartphones worldwide, making them the most frequently repaired display type in any workshop. If you want to go further on the different variants available, the guide to LCD types for repairs breaks each one down in useful detail.
How LCD screens work in mobile devices
Now that you know what an LCD is, let us explore exactly how this technology works inside the devices you repair. A mobile LCD is not a single sheet of material. It is a stack of distinct layers, each performing a specific role, all working in precise sequence.
Here is how the layers are ordered from back to front:
- LED backlight: Produces the white light that illuminates the entire display.
- Polarising filter: Orientates light waves in a single direction before they reach the crystals.
- Liquid crystal layer: Twists or blocks polarised light depending on the voltage applied to each pixel.
- Colour filter: Splits each pixel into red, green, and blue sub-pixels to produce the full colour spectrum.
- Touch sensor (digitiser): Detects the location of finger contact on the screen surface.
- Cover glass: The protective outer layer you actually touch.
This layered construction, confirmed in the mobile LCD repair essentials overview, is why LCD panels use liquid crystals to modulate backlight into images you see on screen. Each layer is calibrated to work with the others. Damage to any single layer often compromises the whole assembly.
Here is how LCD compares to the OLED screens found in premium devices:
| Feature | LCD | OLED |
|---|---|---|
| Backlight | Required (always on) | None (pixels self-illuminate) |
| Black levels | Grey, not true black | True black (pixel off) |
| Thickness | Slightly thicker | Thinner |
| Cost to replace | Lower | Higher |
| Repairability | Simpler assembly process | More fragile, complex |
Understanding screen assembly differences matters practically because the digitiser, LCD, and cover glass in most modern phones are fused together under heat and pressure during manufacture. Attempting to separate them without professional equipment damages the panel almost every time.
Pro Tip: Never assume you can peel a cracked glass away from a working LCD. The adhesive bond is extremely strong. Order a full assembly from the outset and save yourself a ruined part.
Changing an LCD: key steps and common pitfalls
Understanding the construction and integration of LCDs paves the way to tackling actual replacements wisely. Most repairs you encounter will involve swapping out the complete assembly, not attempting individual layer separation.
As the full LCD assembly replacement guide notes, LCD screens in mobile repairs are replaced as full assemblies (glass plus LCD plus digitiser) due to fused construction, and glass-only separation risks damage without professional equipment. This is not a workaround. It is the correct approach for almost every job.
Here are the key steps to a clean LCD replacement:
- Power off the device fully before touching anything internal. Residual charge can damage flex cables and other components instantly.
- Remove the back cover using a heat gun or suction cup, depending on the device type. Plastic clips require careful prying.
- Disconnect the battery before detaching any screen connectors. This is a non-negotiable safety step.
- Unplug the LCD flex cable from the motherboard. These connectors are delicate. Use a plastic spudger, never metal tools.
- Transfer the old frame to the new assembly if using a Samsung Service Pack or similar pre-assembled unit. This preserves mounting points and face sensors.
- Reconnect and test before full reassembly. Power on the device, check touch response and image quality, then close it up.
Attempting glass-only separation without specialist heating equipment and vacuum tools causes permanent LCD damage in the vast majority of cases. The cost saving is rarely worth the risk.
For a full walkthrough, the mobile LCD repair guide covers device-specific nuances in greater depth, and the screen replacement details page adds useful context for different handset families.
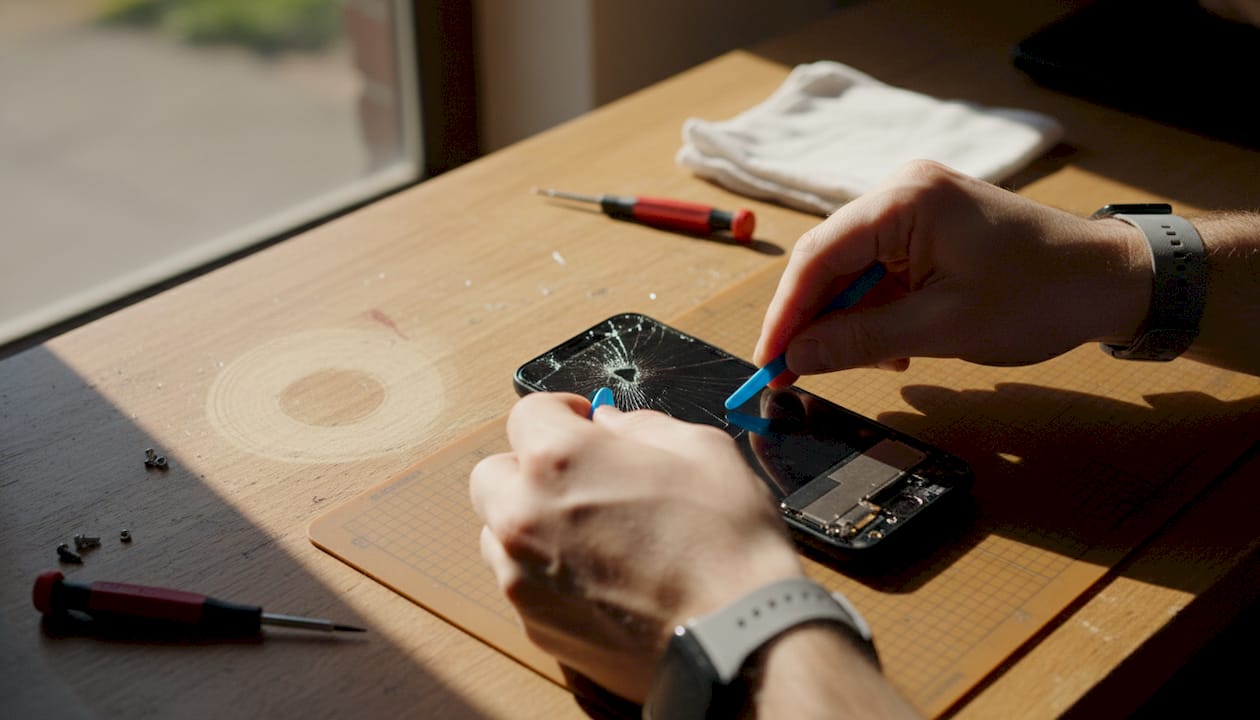
Pro Tip: Invest in a proper toolkit: a quality spudger set, heat mat, and anti-static wrist strap. These three items alone prevent the most common DIY mistakes and protect both you and the parts.
LCD types and how to choose the right one for repairs
With an understanding of how LCDs are replaced, let us focus on choosing the right screen for the job. Not all LCDs are equal. The type of panel affects colour quality, viewing angles, battery draw, and how customers perceive the finished repair.
The three main types you will encounter in mobile repair work are:
- IPS (In-Plane Switching) LCD: The premium standard in mobile displays. IPS panels offer wide viewing angles, accurate colour reproduction, and good brightness. They cost more than basic alternatives but deliver results customers notice. Best for flagship and mid-range devices where image quality matters.
- TFT (Thin-Film Transistor) LCD: The workhorse of budget smartphones. TFT screens are cheaper to produce, have narrower viewing angles, and colours shift when viewed from the side. Perfectly adequate for budget repairs where cost is the priority.
- Bar type LCD: Typically found in feature phones and older handsets with simpler displays. These are straightforward panels without the complexity of smartphone assemblies. You will encounter them less frequently, but they remain relevant for older device repairs.
Choosing the right replacement comes down to three questions. First, what type of panel did the original device use? Matching the original technology maintains the experience the customer expects. Second, what is the customer’s budget? IPS costs more; TFT saves money. Third, how is the device used? A phone used primarily outdoors benefits from a brighter IPS panel, while an occasional-use backup phone is fine with TFT.
For more detail on panel differences, the LCD screen types article provides a thorough comparison, and the guide to bar type LCDs is essential reading for older handset repairs.
Pro Tip: Always confirm the exact device model number before ordering a replacement, not just the brand and series name. Manufacturers sometimes change panel suppliers mid-production run, meaning two phones with identical names may need different screens.
The reality of LCD repairs: what most people miss
Most beginners look at an LCD replacement and see a straightforward swap. Remove old screen, fit new one, done. The reality is considerably more involved, and that gap between expectation and reality is where expensive mistakes happen.
The fused nature of modern assemblies, where glass, LCD, and digitiser are bonded together under factory conditions, means that full assembly replacements are not just the convenient option but the technically correct one for most repair scenarios. Professionals who attempt glass-only separation without dedicated heating equipment and vacuum separation tools damage the panel far more often than they save it. The economics rarely stack up.
What genuinely separates skilled repairs from amateur ones is not access to obscure techniques. It is rigour. Following every step in the correct order, using the right tools, and sourcing quality parts makes the critical difference. Checking the DIY repair realities before your first attempt is worth every minute. Patience and preparation are not optional extras. They are the job.
Get expert support for your next LCD repair
If this guide has sharpened your understanding of LCD technology and what successful replacement actually requires, the natural next step is sourcing parts you can trust. At Buy2fix, we stock quality LCD assemblies for iPhone, Samsung, Huawei, Xiaomi, OPPO, and many other major brands, all backed by a one-year warranty and free UK mainland shipping. Every part is checked before it leaves us. You will also find detailed LCD repair info across our blog, giving you the technical grounding to approach any job with confidence. Whether you are fitting your first screen or running repairs at volume, we are here to make the process straightforward.
Frequently asked questions
What does LCD stand for?
LCD stands for Liquid Crystal Display, a flat-panel technology that uses liquid crystals and a backlight to produce images, found in the vast majority of mobile devices.
Can I replace just the glass on an LCD screen?
In most cases, separating the glass from the LCD without specialist equipment causes permanent damage; full assembly replacement is the recommended and most reliable approach.
How do I choose the right LCD for my device?
Match the replacement to your exact device model number, confirm the original panel type (IPS or TFT), and verify compatibility before ordering to avoid costly mismatches.
Why are LCD assemblies often fused together?
Manufacturers bond the glass, LCD, and digitiser under pressure during production to improve display performance and reduce thickness, which means fused construction requires the entire unit to be replaced if any one layer fails.
Recommended
- Understanding LCD display screens: the DIY repair essential – buy2fix
- What Are LCD Screens? Repair and Replacement Essentials – buy2fix
- Types of LCD Screens: A Guide for Repair Experts – buy2fix
- What is LCD display in mobile: essential guide for repairs – buy2fix
- MacBook screen replacement: restore your display in 2026
Let customers speak for us
Well made part very strong easy to fit great value for the money

Well packed, with fast shipping :)

Exactly what the doctor ordered…great color, comfort, and durability. Trust this watch band!

Brilliant strap, second purchase, bought bracelet before. Excellent value. Thank you

Great item for splitting your Audio signal

Outstanding product!
Next level customer service.

Very satisfied but the delivery needs to get more faster...

Good price,quick delivery

Best phone case ever! This is my second one as I broke my first. Would defo recommend

Great fitting Apple Watch bands

For Apple Watch Ultra 3 / 2 / 1 49mm RedPepper Armor Metal Case Integrated Silicone Watch Band(Steel Black White)

Good price and quick postage

Perfect fit.

Absolutely necessary

Second Purchase and still a very happy customer. Keep up the good work.
