

Safe DIY phone repairs: expert tips for worry-free fixes
TL;DR:
- Performing DIY phone repairs without proper safety precautions, like ESD protection, can cause irreparable damage to internal components. The greatest risks are static discharge and improper tools, which often occur before any screws are removed. Using a grounded workspace, plastic tools, and following a structured safety process ensures successful repairs and protects delicate phone circuitry.
Attempting a phone repair at home without the right preparation can turn a £40 screen fix into a £400 motherboard replacement. Static discharge, wrong tools, and cluttered workspaces are responsible for more irreversible phone damage than most people realise, and the mistakes often happen before a single screw is removed. Whether you are replacing a cracked Samsung Galaxy screen or swapping an iPhone battery, the gap between a successful repair and a bricked device almost always comes down to safety discipline, not technical skill. This guide walks you through every stage of a safe, professional-grade DIY repair.
Table of Contents
- Understanding the main risks in DIY phone repairs
- Preparing your workspace and gathering essential tools
- Step-by-step: the safest DIY phone repair process
- Troubleshooting and avoiding common safety mistakes
- Why safety is underrated in home phone repairs: an expert perspective
- Next steps: equip your DIY repairs with proven safety
- Frequently asked questions
Key Takeaways
| Point | Details |
|---|---|
| ESD protection is vital | Static-safe equipment like mats and wrist straps prevent hidden, costly damage to your phone. |
| Invest in proper tools | Plastic prying kits and ESD-safe screwdrivers are essential for safe repairs—avoid household tools. |
| Clean workspace matters | A clean, well-lit, static-free area dramatically reduces repair risks and improves outcomes. |
| Follow step-by-step processes | Careful adherence to safety steps is what separates DIY success from accidental phone destruction. |
| Know when to call experts | If something seems unsafe or you hit an obstacle, seeking professional help protects your investment. |
Understanding the main risks in DIY phone repairs
Before you pick up a screwdriver, it is worth being honest about what actually goes wrong during DIY repairs. Most people assume the biggest risk is breaking a fragile screen or snapping a ribbon cable. In reality, the damage that cannot be undone is usually caused by electrostatic discharge (ESD), which is the invisible static charge that your body carries at any given moment.
A discharge you cannot even feel can permanently destroy the integrated circuits (ICs) inside a phone. These tiny chips manage everything from charging to touch sensitivity, and they can fail instantly when exposed to static voltage. As ESD protection is non-negotiable for UK DIYers and small businesses, even minor static events can destroy ICs and chipsets without leaving any visible sign of damage. You may reassemble the phone perfectly and still end up with a device that never charges again.
Beyond static, improper tooling is the second most destructive mistake. Metal prying tools used near a printed circuit board (PCB) can scratch conductive tracks or create short circuits that fry components the moment power is restored. A PCB scratch is not always visible to the naked eye, yet it can kill an entire subsystem.
Common risks that lead to avoidable damage include:
- Using flathead screwdrivers or metal spudgers near circuit boards
- Repairing on carpeted floors or synthetic fabric surfaces that generate static
- Working in poor lighting where tiny connectors and screws are easily missed
- Allowing moisture from drinks or humid environments into the workspace
- Skipping the step of powering down and disconnecting the battery before opening a device
“The most expensive repair is the one that turns a working phone with a cracked screen into a completely non-functional device. Every shortcut has a price.”
Reviewing common phone repair mistakes before you start is one of the most practical investments of your time. Understanding these patterns helps you recognise the warning signs before damage occurs rather than after.
Preparing your workspace and gathering essential tools
Once you understand what the risks are, the next step is designing a workspace that neutralises them. A professional repair bench does not need to be expensive, but it does need to be thoughtful. The single most impactful change any DIYer can make is switching from a kitchen table covered in clutter to a clean, flat, hard surface with proper ESD protection in place.
Using an ESD-safe workstation with a mat, wrist strap, and purpose-built tools protects sensitive components from electrostatic discharge at every stage of the repair. This is not optional equipment for phone repair. It is the foundation.
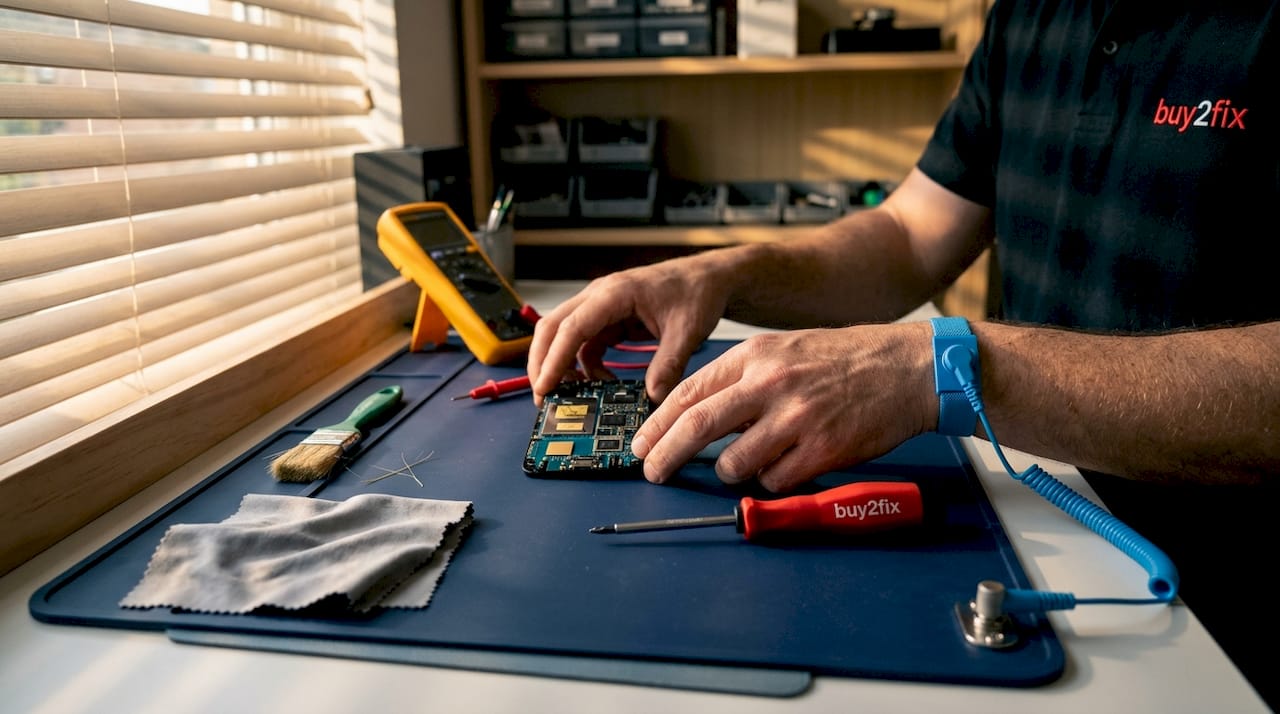
You should also work in a clean, well-lit, static-free area and use precision plastic tools, avoiding metal pry tools near components wherever possible. Proper overhead lighting, ideally with a magnifying element, lets you see fine connector tabs and micro screws that are invisible under standard room lighting.
Here is a practical breakdown of the equipment you need, from essential starter items to more advanced professional additions:
| Equipment | Purpose | Priority level |
|---|---|---|
| ESD anti-static mat | Dissipates static from workspace surface | Essential |
| ESD wrist strap | Grounds your body to prevent static discharge | Essential |
| Plastic spudger set | Safe prying without scratching PCBs | Essential |
| Precision screwdriver set | Handles Pentalobe, Torx, and Phillips head screws | Essential |
| Magnetic screw tray | Keeps micro screws organised during disassembly | Highly recommended |
| Tweezers (non-conductive) | Placing and lifting delicate connectors | Highly recommended |
| Magnifying lamp | Illuminates fine details on small components | Highly recommended |
| Anti-static bags | Storing components safely during repair | Advanced |
| Heat gun or iOpener tool | Loosening adhesive on screens and back glass | Advanced |
You can also explore our detailed guides on essential phone repair tools and common mobile repair tools to get a fuller picture of what each item does and when to use it.
Things to actively avoid in your workspace include:
- Synthetic carpets or rugs under your chair or feet
- Loose clothing made from polyester or wool that generates charge
- Drinks or food within arm’s reach of open devices
- Bright overhead lights with exposed bulbs that generate heat near battery components
- Using your phone camera flash as a substitute for proper task lighting
Pro Tip: Before touching any internal component, touch the ESD mat with both hands for a full three seconds. This discharges any residual static even if your wrist strap is already connected. It costs nothing and takes three seconds. Make it a habit.

Invest in quality ESD wrist straps and mats from the start. Cheap, poorly grounded versions give you a false sense of security. Check that your wrist strap has a 1 megaohm resistor in line, which is the standard specification that protects you while safely dissipating charge.
Step-by-step: the safest DIY phone repair process
With your workspace properly set up, you are now ready to carry out a repair. The following steps apply to the most common procedures such as screen replacements and battery swaps. Follow this order precisely, and treat each note as a checkpoint rather than a suggestion.
- Back up your data before opening the device. This is not a safety step for the phone; it is a safety step for you. If anything goes wrong, your photos, contacts, and app data are protected.
- Power the device completely off. Do not simply put it to sleep. Hold the power button and confirm shutdown through the menu.
- Ground yourself and your workspace. Connect your wrist strap and confirm the mat is grounded. Check both connections before you lift any tools.
- Remove the SIM card tray using the correct ejector pin. This prevents damage to the tray during reassembly.
- Apply heat if required. For adhesive-sealed devices such as most modern iPhones and Samsung Galaxy models, use a heat gun or iOpener tool set to the correct temperature (typically 60 to 80 degrees Celsius) around the display perimeter. Do not overheat. Battery proximity makes excessive heat a genuine risk.
- Use plastic tools exclusively when prying open the housing. Work slowly around the perimeter and never force. If something is not moving, there is likely an adhesive strip or hidden clip you have missed.
- Disconnect the battery connector first after opening the device. This is your primary safety action. Until the battery is disconnected, the board is live. The use of precision plastic tools and clean working conditions protects the board from accidental shorts during this stage.
- Remove and replace the target component. Handle all flex cables and connectors from the connector body, not the cable itself. Never tug on ribbon cables.
- Reconnect the battery last. Before closing the device, gently press each connector until you feel it click into place.
- Test before sealing. Power on and test all functions (touch, camera, speakers, charging) before applying adhesive or replacing screws. This is your chance to catch a misaligned connector before you seal it in.
For a deeper walkthrough of screen-specific procedures, the phone screen replacement guide covers model-specific variations in useful detail.
| Approach | Safe method | Risky shortcut |
|---|---|---|
| Opening the device | Plastic spudger, gradual heat | Metal screwdriver, brute force |
| Disconnecting battery | First step after opening | Ignored or done last |
| Handling connectors | Lift gently by body | Pull by cable |
| Grounding | ESD mat and wrist strap both used | Neither used |
| Testing | Full function test before sealing | Power on only after sealing |
Pro Tip: Lay each screw group on a strip of tape and label it with the location it came from (for example, “bottom screws” or “battery bracket”). Micro screws look identical but have different thread pitches. Forcing a wrong screw strips threads in the chassis permanently.
For broader guidance on keeping costs down and staying safe across multiple repair types, the DIY phone repair tips resource covers the smart approaches used by experienced technicians.
Troubleshooting and avoiding common safety mistakes
Even experienced technicians encounter problems. What separates them from beginners is knowing how to respond without causing additional damage. Panic is the enemy of a good repair outcome. If something does not look or feel right, stop and assess rather than push forward.
The most common mistakes that lead to serious consequences include:
- Skipping ESD grounding altogether, particularly on carpeted or synthetic surfaces where static builds up fast
- Forcing connectors that will not click in, which bends the socket and makes future repairs far harder
- Over-tightening screws, which cracks PCBs and strips threads in aluminium frames
- Reassembling with loose or misaligned flex cables, which causes phantom touch issues, display lines, or charging failures
- Using incorrect screwdriver sizes, which rounds off screw heads and makes them impossible to remove later
“If your phone smells of burning during or after a repair, stop immediately. Do not attempt to power it on. A burnt smell near a battery or board indicates a potential safety hazard, not just a failed repair.”
Confirmed as best practice across professional workshops, a proper ESD-safe workstation and tools are what protect you from the most common and costly mistakes. Without them, you are essentially working with unknown risk at every stage.
If your phone does not respond after reassembly, the most frequent causes are a slightly unseated battery connector, a display cable that clicked in at an angle, or a single missed screw that holds a ground point. Work through each systematically rather than guessing. Brushing up on mobile phone repair basics gives you the diagnostic vocabulary to identify what went wrong and how to fix it without causing further damage.
Data safety is also a serious consideration during any repair. If you need to hand your device to someone else or send it for parts verification, review the guidance on how to protect mobile data in repairs before proceeding. This is especially important for small repair businesses handling customer devices.
Knowing when to stop is a skill in itself. If you encounter an unknown component, a board-level fault, or a battery that looks swollen or deformed, do not continue. Swollen lithium batteries can rupture when punctured or stressed, causing fires. These situations require professional assessment.
Why safety is underrated in home phone repairs: an expert perspective
There is a persistent assumption in the DIY repair community that technical skill is what determines success. People spend hours watching teardown videos and memorising connector placements, then rush through the workspace setup in two minutes without an ESD mat in sight. We understand that impulse. The fix looks exciting. The safety steps look boring.
But here is the uncomfortable reality we have seen play out time and time again: the repair that goes wrong almost never fails because someone did not know how to replace a screen. It fails because someone skipped grounding, worked on a cluttered surface, or used the wrong tool in a hurry. Safety protocols feel tedious because they do not feel productive. Nothing visible happens when you correctly discharge static. Nothing happens when you use a plastic spudger instead of a metal one. The absence of damage is invisible.
Modern smartphones have made this even more unforgiving. Devices from 2022 onwards use increasingly compact board layouts where ICs are stacked in layers, memory and processor chips share tiny packages, and heat management is more delicate than ever. The margin for error is shrinking. Shortcuts that a competent technician might have taken on a 2016 iPhone would cause irreversible damage on a current Samsung Galaxy S25.
If there is one opinion we would press on anyone beginning their repair journey through a phone repair for beginners guide, it is this: treat safety as the skill. The technical steps are learnable in an afternoon. The discipline to set up properly every single time, without shortcuts, is what actually makes the difference between a repair business that grows through reputation and one that loses customers after three jobs.
The biggest regrets we hear from technicians are never “I failed the repair.” They are always “I skipped the mat just that once.”
Next steps: equip your DIY repairs with proven safety
The knowledge in this guide only delivers results when paired with the right equipment. Understanding ESD risk means nothing if you are still working on bare wood with a borrowed flathead screwdriver. The good news is that quality safety gear is now accessible and affordable, and it removes most of the beginner guesswork at a stroke. At Buy2Fix, we stock ESD mats, wrist straps, precision tool kits, and a full range of trusted repair accessories designed for both home DIYers and professional repair technicians across the UK. Every item is checked before dispatch, with free UK mainland shipping and a 30-day return policy, so you can build your toolkit with confidence and focus on doing the job right.
Frequently asked questions
What is the most important safety step for DIY phone repairs?
Always use an ESD-safe mat, wrist strap, and tools to prevent static electricity from destroying sensitive internal components before you even begin disassembly.
Can I use kitchen tools for mobile repairs at home?
No. Metal kitchen implements can cause short circuits and scratch PCBs. Always use precision plastic or ESD-safe tools designed specifically for electronics work.
What should I do if my phone does not turn on after a DIY repair?
Double-check every connector is fully seated, confirm the battery cable has clicked into its socket, and inspect for any metal fragments near the board. If the phone still does not respond, consult a professional technician rather than attempting further disassembly.
Is it safe to repair a phone on a carpeted floor?
No. Carpet generates significant static electricity through friction, dramatically increasing the risk of ESD damage to internal components. Always use a grounded anti-static mat on a firm, hard surface.
Recommended
Let customers speak for us
For Samsung Galaxy A26 SM-A266B Original Earpiece Speaker with Cable

Very good communication throught. Good product

Well made part very strong easy to fit great value for the money

Well packed, with fast shipping :)

Exactly what the doctor ordered…great color, comfort, and durability. Trust this watch band!

Brilliant strap, second purchase, bought bracelet before. Excellent value. Thank you

Great item for splitting your Audio signal

Outstanding product!
Next level customer service.

Very satisfied but the delivery needs to get more faster...

Good price,quick delivery

Best phone case ever! This is my second one as I broke my first. Would defo recommend

Great fitting Apple Watch bands

For Apple Watch Ultra 3 / 2 / 1 49mm RedPepper Armor Metal Case Integrated Silicone Watch Band(Steel Black White)

Good price and quick postage

